Microsoft Flight Simulator 2024 is out, and one of its promised features was a detailed flight planner, complete with charts, performance calculations, weather information, and more. If you’re new to aviation or have never delved into proper flight planning and are intimidated by MSFS 2024’s new flight planner, then this is the guide for you! In this guide, I’ll show you around the new flight planner by guiding you through creating both VFR and IFR flight plans while showing you some of the new planner’s features along the way.
Two Planners: Choose The Right One
MSFS 2024 comes with two flight planners, the online planner and the EFB planner. The online planner is available here and is the most feature-complete. The EFB planner is only available inside the simulator through the “EFB” (Electronic Flight Bag) tool. While the EFB planner might be okay for getting a quick plan up, I generally do not recommend using it, as it’s missing many of the features that the online planner has and is generally less user-friendly. This guide will be focused on the online planner almost exclusively, with a few mentions of the EFB here and there.
Layout
Once you log in to the online flight planner using the same Xbox account you used for MSFS 2024, you’ll be greeted with a map and some options on either side of the screen. Let’s go over what everything does.
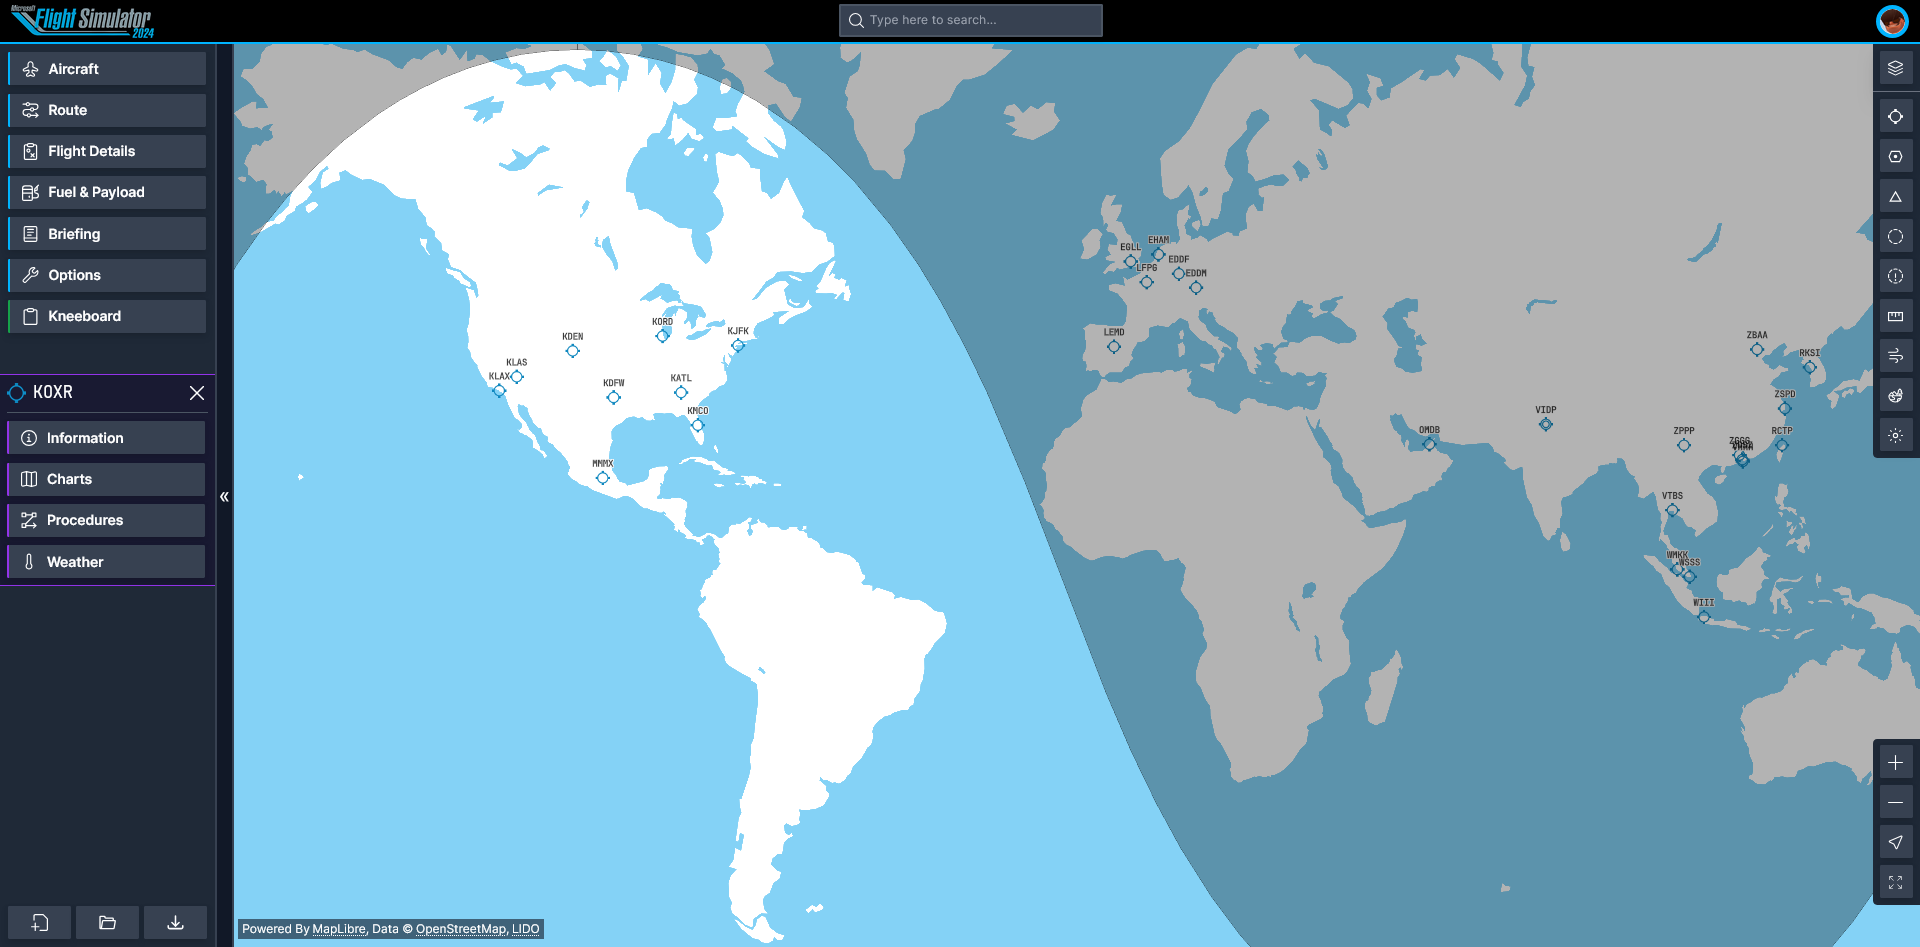
First, in the middle of the screen is the map, of course. This is where you’ll be able to view and visually construct your routes. It features a day/night line so you can choose the best place to fly if you want to use real time. Above the map is a search bar that you can use to find airports or navaids. The buttons on the right side of the screen are the map options. Let’s go over each one:
 Map Presets: These allow you to choose between presets that change the map’s settings to display the most relevant information depending on the type of flight you’re doing. The options are IFR High, for Instrument Flight Rules flights above 18000 feet; IFR Low, for Instrument flights below 18000 feet; and VFR, for Visual Flight Rules flights.
- Airports: With this button, you can toggle airports on and off, useful for decluttering the map once your plan is complete.
- Nav Aids: Here you can change whether you want to show or hide airways (Low airways if IFR Low is selected, High airways if IFR High is selected), Radio navaids like VORs and NDBs, and landing aids like Localizers. Clicking on the radio navaids in the map will reveal useful information like frequency, range, and coordinates.
- Waypoints: This allows you to show or hide terminal waypoints, which are used in airport-specific procedures; enroute waypoints, which are used for general flight planning; or VFR Reporting Points, which are used by VFR pilots to add visual waypoints to GPS flight plans.
- Airspaces & Restricted Airspaces: These settings allow you to show or hide airspaces and restricted airspaces, useful for VFR flight planning to avoid entering controlled airspace without permission. The Airspaces setting also allows you to show MORA (Minimum Off-Route Altitude) for any sector and FIR Airspaces so you know what center controller to talk to during cruise.
- Measurements: This allows you to show, hide, or delete any measurements you make on the map. To make a measurement, right-click (without dragging) on any point on the map and then click the measurement icon on the top-right of the context menu.
- Weather: Here you can show or hide cloud coverage, precipitation, and wind barbs. The options have sliders to let you adjust the time so you can get a better idea of how the clouds, precipitation, or wind are changing and plan accordingly.
- Landmarks: Here you can show or hide landmarks such as cities, highways, roads, railways, and others on the map.
- Day/Night Line: This button allows you to toggle the day/night line that shows on the map in case you want to brighten up a part of the map that is obscured by nighttime.
The rest of the planner’s functions will be explained in the next sections, where I’ll go over how to make flight plans for both VFR and IFR flights.
VFR Planning
VFR stands for “Visual Flight Rules.” These types of flight plans are most often used in general aviation when the weather is clear enough to allow you to fly by using visual references only. With this type of flight plan, it’s not necessary to follow a specific route, so these types of flights are great for sightseeing or having fun. Be careful with airspace though, as busting through the Class B, C, or D airspace of an airport without authorization will get you in trouble in online networks like VATSIM.
Setup
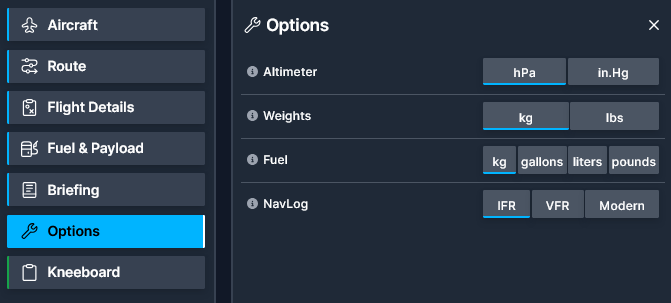
To get started with a VFR flight plan, choose the VFR option in the map preset settings so only the most relevant information like visual landmarks, roads, and terrain elevation is displayed. Then, check the settings page on the left side to ensure that the plan options are set correctly. For a VFR flight in the US, select the altimeter setting to in.Hg, weights to lbs, fuel to gallons, and navlog to VFR.

Then, choose an area to fly in. I’d like to do a nice and easy scenic flight that goes all along the coast of Los Angeles and ends up at the challenging, but fun Catalina Island. Using the search bar to search for Los Angeles International zooms me right into the area and gets me ready to begin planning.
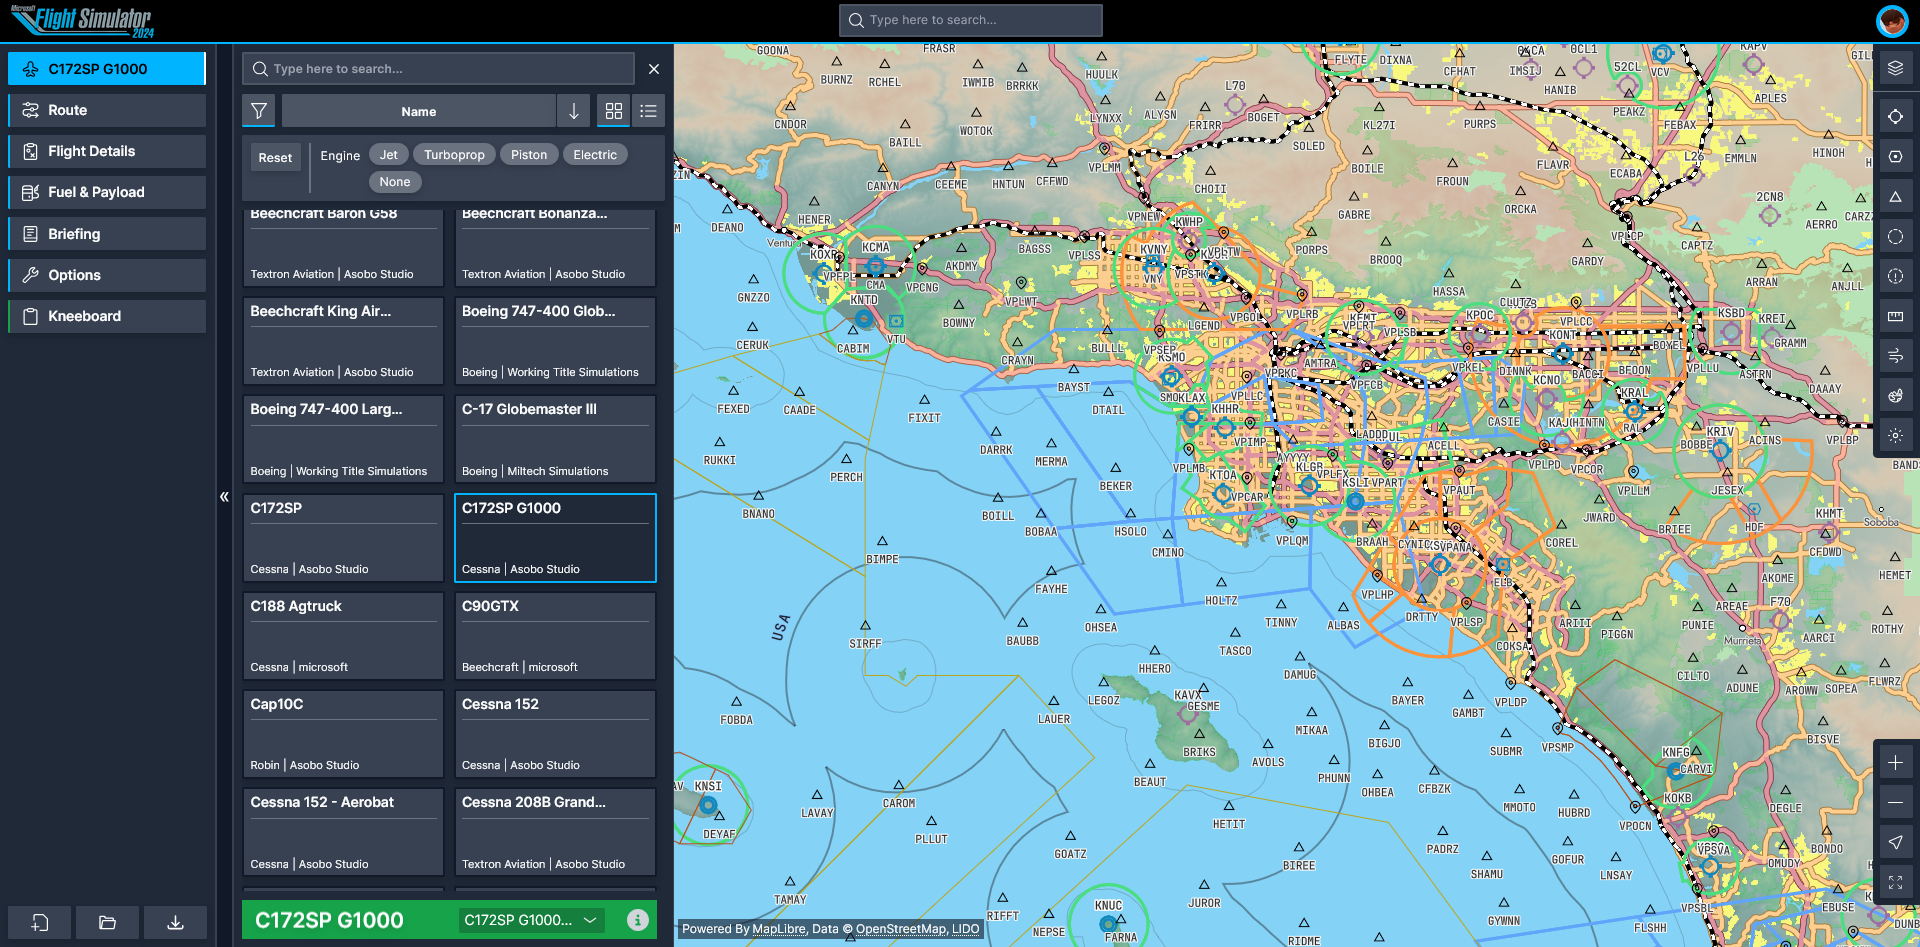
Clicking on the “Aircraft” section on the left side shows you a list of all the aircraft available in the flight planner. For this flight, I’d like something relatively slow with a high wing for the best visibility, so the Cessna 172 will do. In case you’re wondering about add-on aircraft, Working Title, the developer of the flight planner, has said that it intends to add the ability for users to add their own airframes in the future. For now, only the default aircraft are supported.
Picking a Route
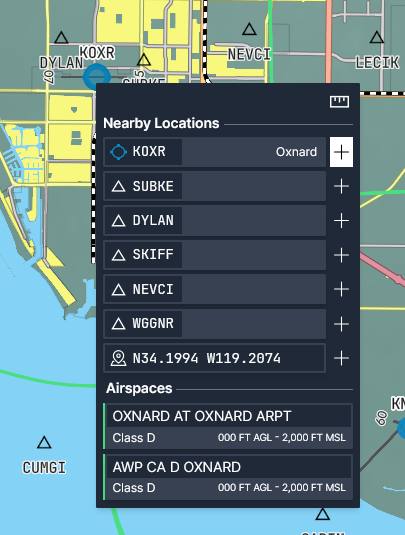
I’d like my route to begin outside of Los Angeles, and Oxnard (KOXR) has some decent scenery available, so I’ll choose it as my departure airport. Zooming into it in the map and right-clicking on the airport brings up the context menu. The plus sign beside KOXR in the context menu allows me to add it to the flight plan as the departure airport, which I do.

To add custom waypoints I want to fly over along the coast, I simply right-click on the area I want to add to the flight plan, click on the coordinates or waypoint that I want to add, and then click “append to flight plan.”
Once I get to the San Francisco Bay Area, things start to get a little complicated, so this is the perfect moment to discuss airspace. As a VFR pilot, one of your main concerns is staying out of airspace you’re not supposed to be in, and a little Cessna flying along the coast of LA right in front of the approach and departure paths of LAX is sure to get us in trouble, so we need to make sure to plan accordingly.
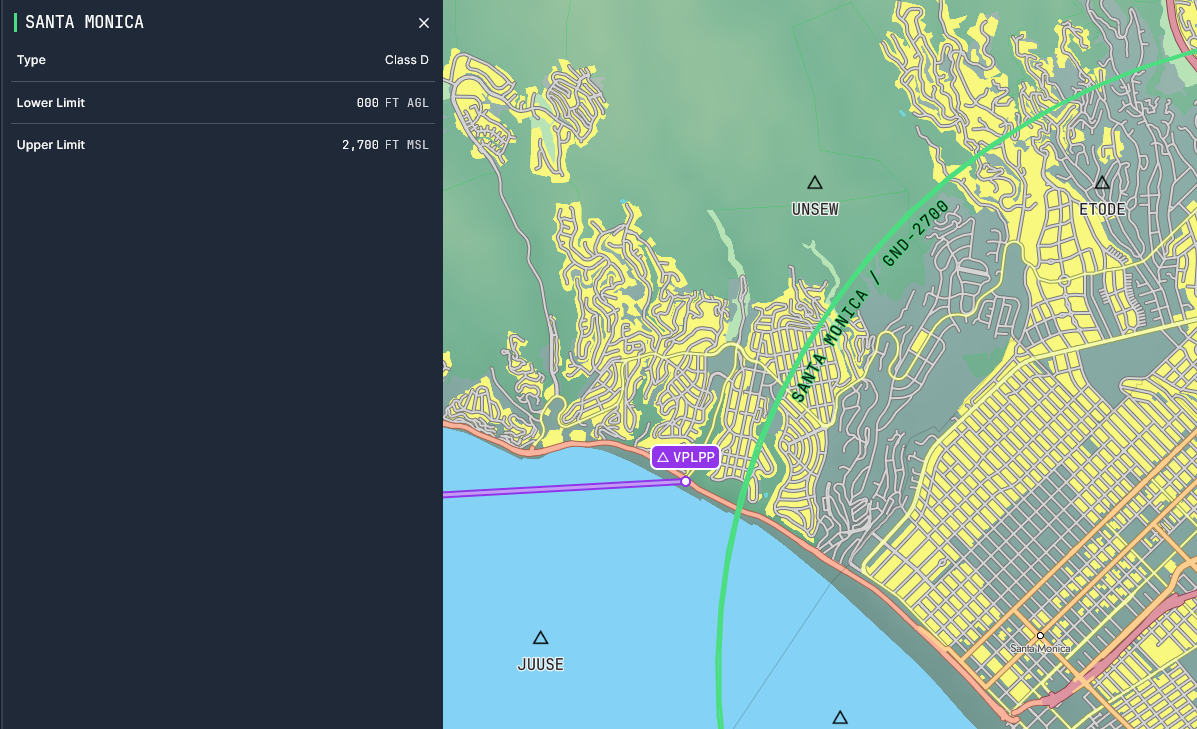
The VFR map preset has airspaces enabled by default, so zooming in on an airspace and clicking on the text that shows up gives us more information about the limits and class of the airspace. Right-clicking on an area also brings up information about that area’s airspace at the bottom of the context menu. Before reaching the bay area, we’ll encounter the Los Angeles North Class B airspace from 5000-10000 feet. Once we get to the bay area, the Santa Monica Class D airspace goes from the surface to 2700 feet.
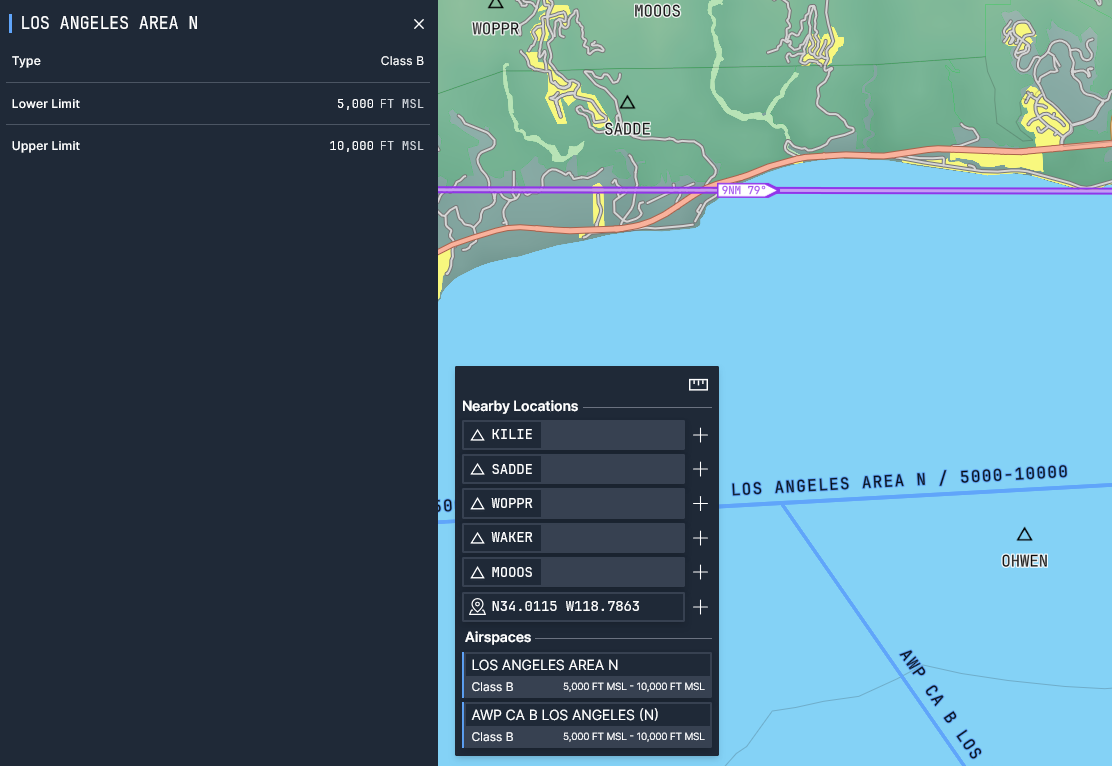
Great, so we have a window from 2700 to 5000 where airspace shouldn’t be a problem. That is, until we get to LAX, where the Class B airspace extends from the surface to 10000. Thankfully, there is a solution, and the Los Angeles TAC (Terminal Area Chart) has our answer. Unfortunately, the flight planner, despite having FAA charts for airports, doesn’t have TACs for flight planning, so we’ll have to find them somewhere else, like SkyVector.
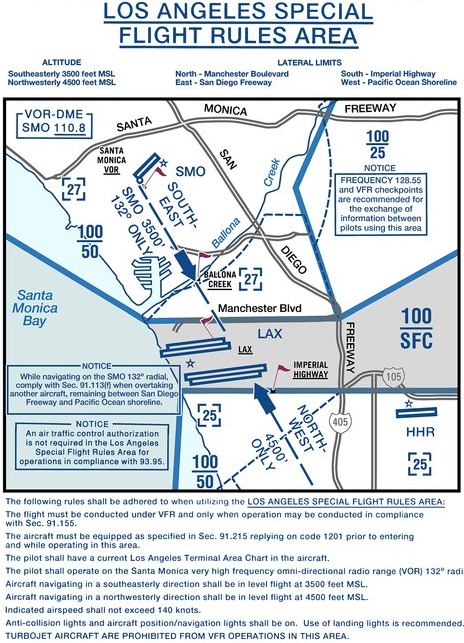
The Los Angeles SFRA allows us to fly southeast on the 132 radial from SMO at 3500 feet. The flight planner doesn’t currently allow us to measure VOR radials, only bearings, so adding this procedure accurately could get a bit complicated. To keep things simple, I’ll simply add a waypoint that goes across LAX and past the class B airspace, keeping in mind that we’ll be using the VOR to navigate this portion of the plan in the sim. Lastly, I added Catalina’s Avalon Airport (KAVX) as our destination, and the enroute section is complete!
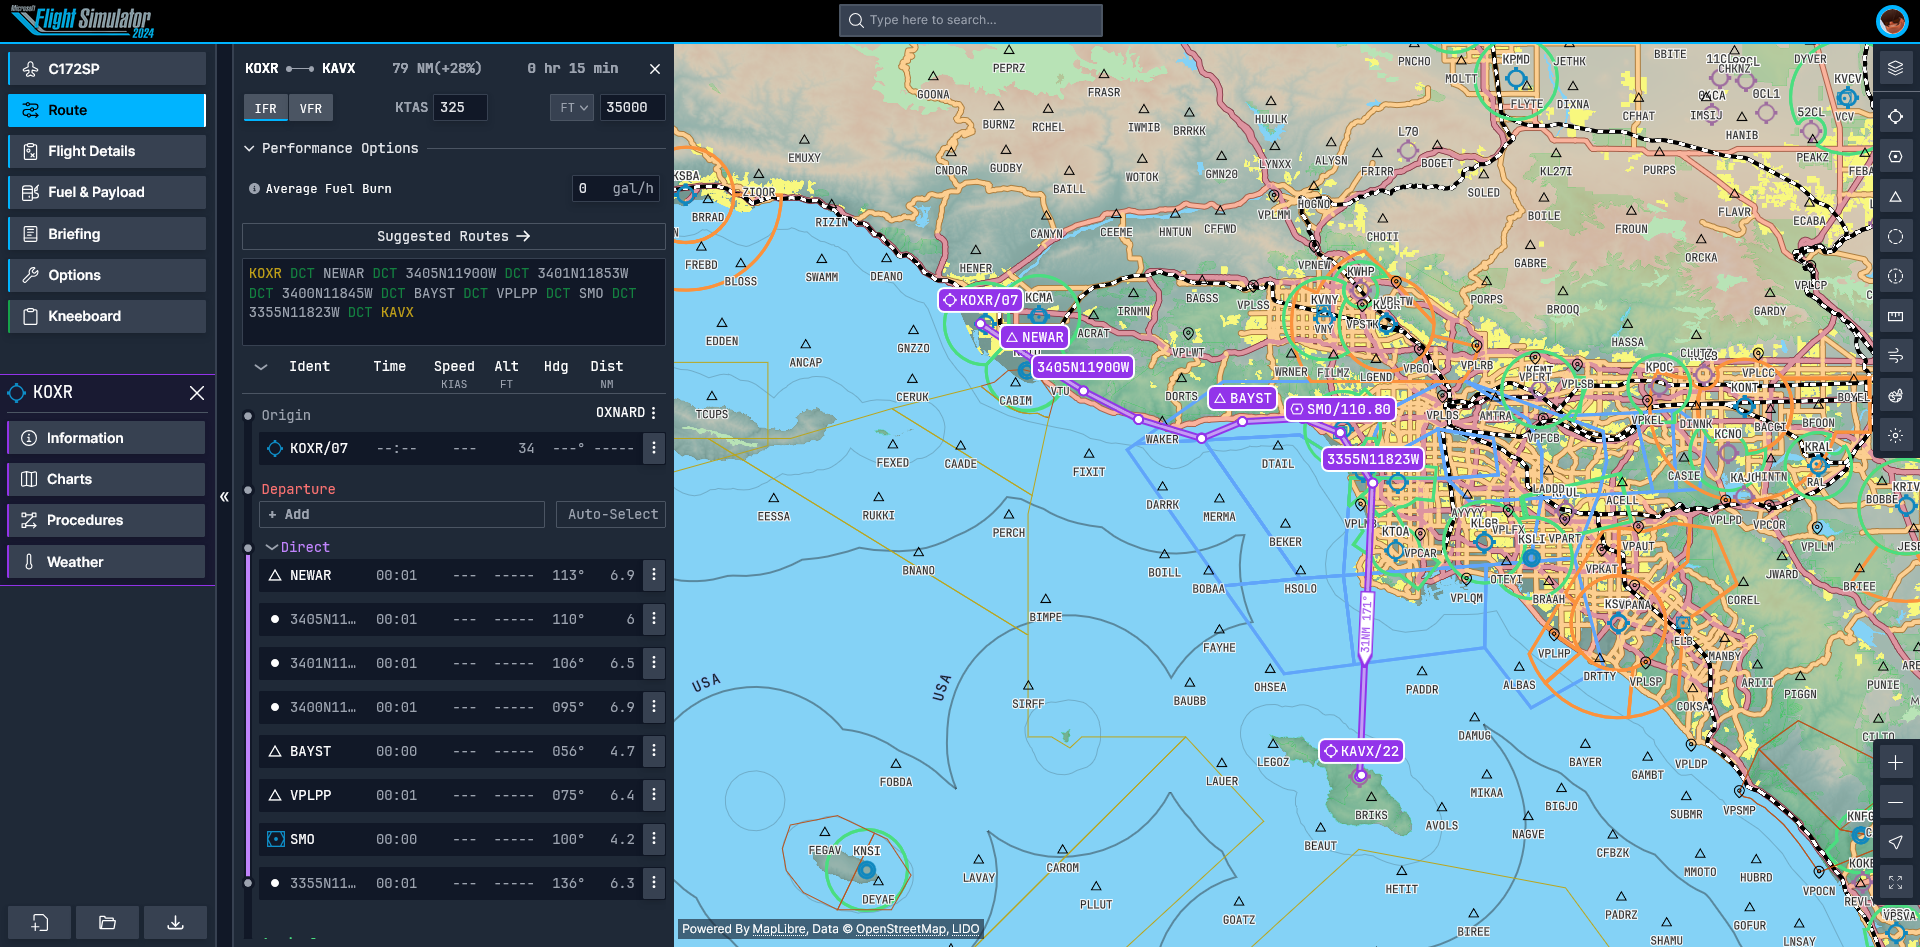
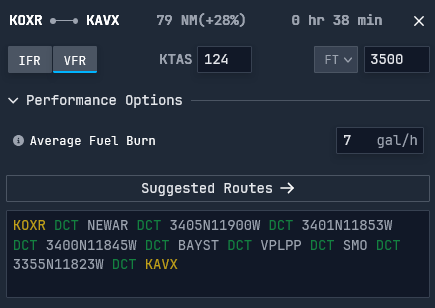
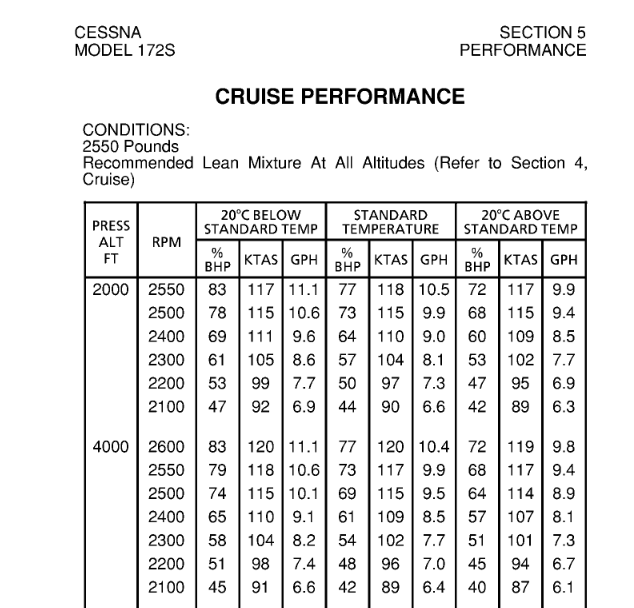
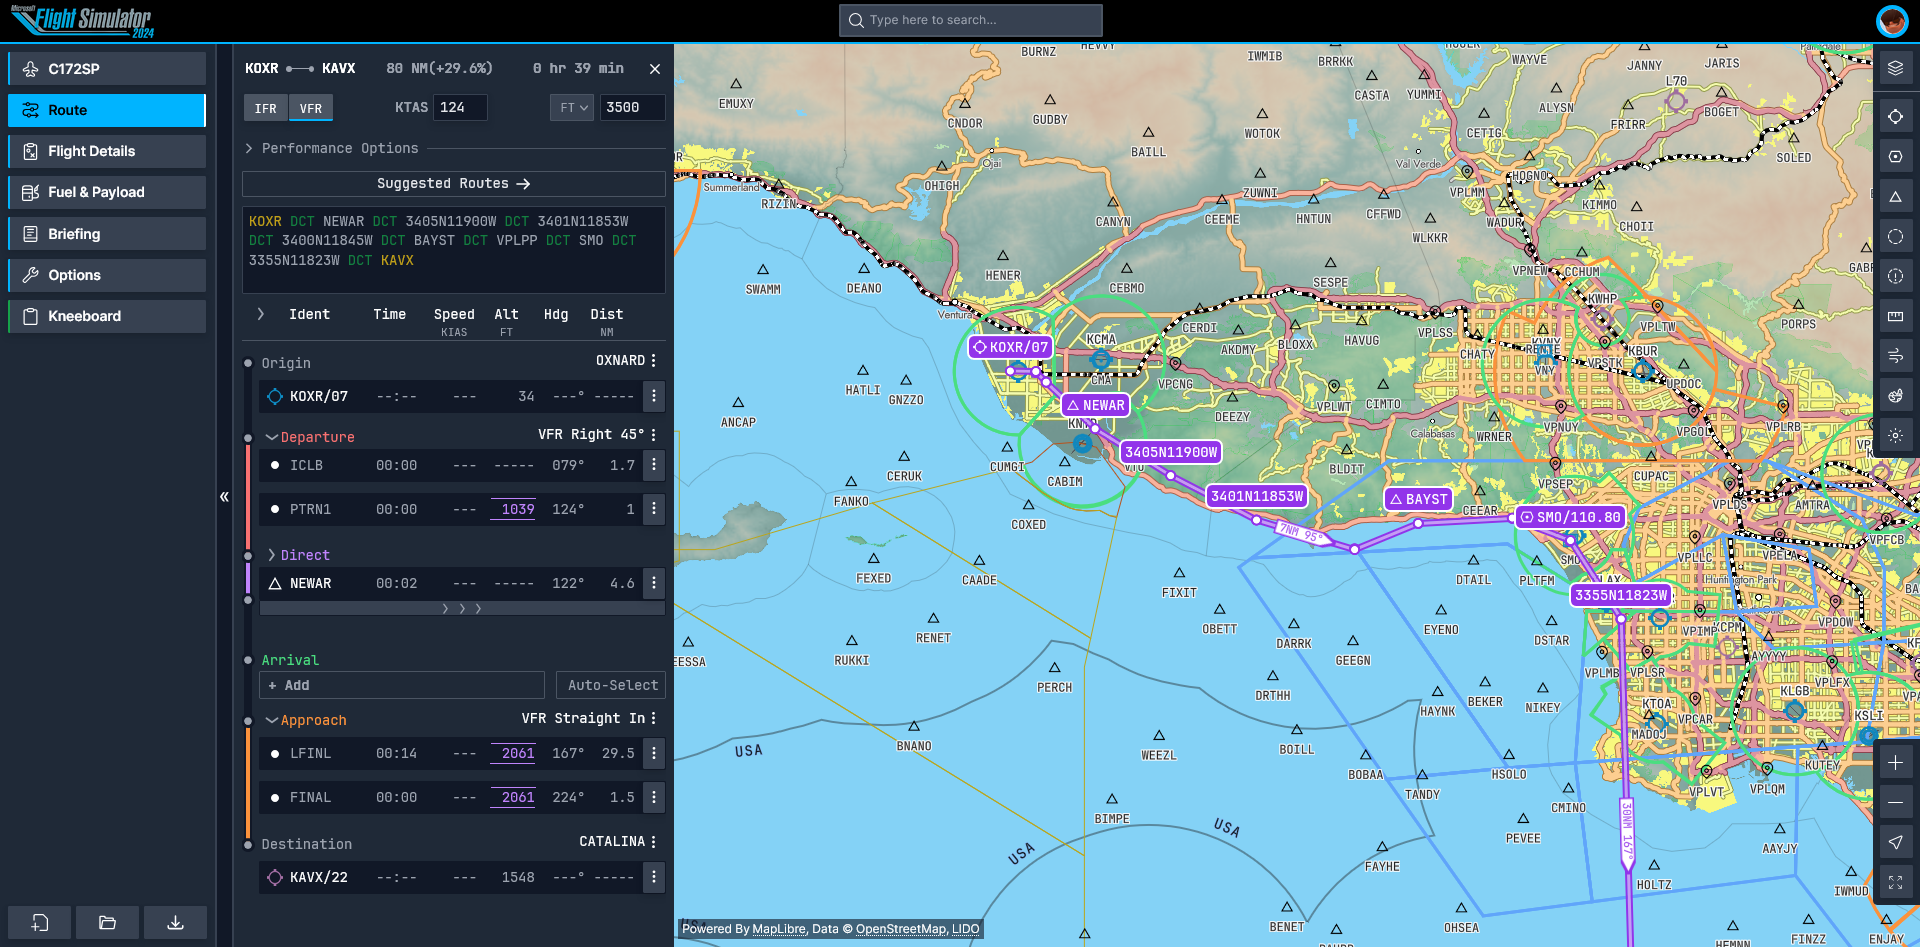
Clicking on the ‘Route’ page, we can see the full details of the route, add procedures, and change performance parameters like our cruise speed and altitude. First, since this is a VFR flight, ‘VFR’ should be selected at the top left of this menu. The KTAS (Knots True Air Speed) is used by the planner to calculate the flight time. One drawback of this planner is that the aircraft profiles don’t automatically change the performance parameters here, so you must look for this information yourself.
The aircraft selection menu in MSFS 2024 has some rough estimates of performance that you can use here. For the Cessna 172, the TAS is 124 Knots. For the cruising altitude, 3500 feet is an appropriate VFR cruising altitude for our easterly flight and is perfect for crossing the SFRA. Clicking on ‘Performance Options’ allows us to set the average fuel burn. This information is also available in the MSFS 2024 selection menu, though it’s not the most accurate, as it says the Cessna 172’s fuel burn is 24.5 L/h, or about 6.5 USgal/h when in reality it’s closer to about 9.3 gal/h.
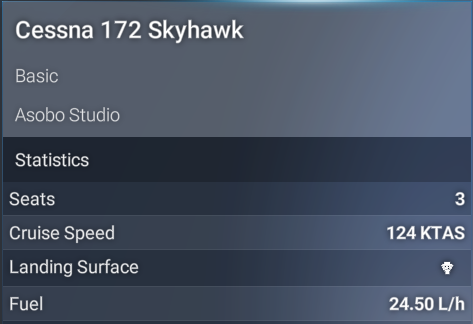
I stuck with the fuel burn from MSFS for this guide, but if you’d like to get more accurate information, you can use the aircraft developer’s manual or search online for “(aircraft type) POH/AFM” for a real manual if the developer didn’t include their own. If you can find the manual, you should be able to find a performance section that includes information about fuel burns at different altitudes. If you can’t find a manual, you can also get it experimentally by simply going on a flight and taking note of your fuel burn in cruise.
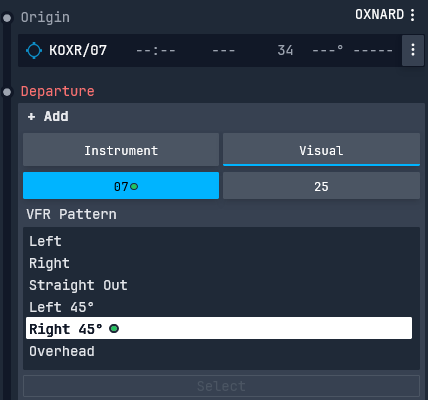
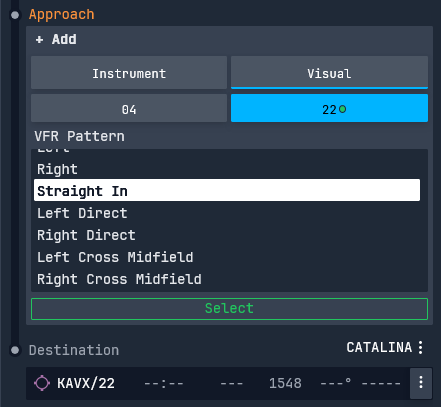
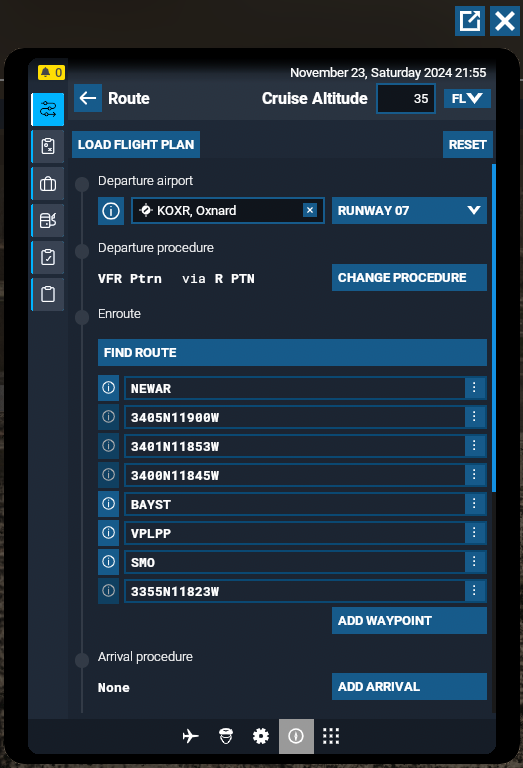
To finalize the route, we can add departure and approach procedures. The planner automatically chooses the departure and arrival runways based on the airport’s conditions, so we just need to scroll down to ‘Departure’, click Add, and then choose a visual departure. In this case, right 45 degrees from 07 at Oxnard fits best. Scrolling down further to the approach, we can add a straight-in approach to runway 22 at Catalina.
Weather
Weather is very important for a VFR flight, so we must check the weather at our departure and arrival airports to ensure that we’ll be able to take off and land without using our instruments. Clicking on an airport in the map will bring up information about that airport. Clicking on KOXR, clicking on the weather tab on the left, then viewing the METAR (METeoroligcAl Report) reveals…
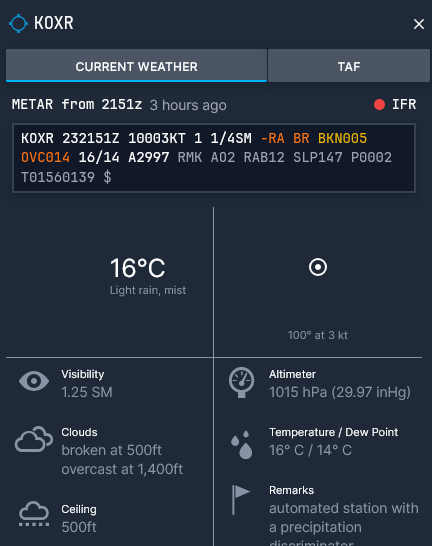
Ah shucks… Our departure airport has a ceiling of just 500 ft, 1.25 Statue Mile visibility, and light rain, which means we won’t be able to take off right now. That’s a shame, but it does provide the perfect opportunity to check out the TAF (Terminal Aerodrome Forecast) on the flight planner to see how long we need to wait to be able to depart. The TAF tab right beside ‘current weather’ shows the latest forecast for the airport in an easy-to-understand way.
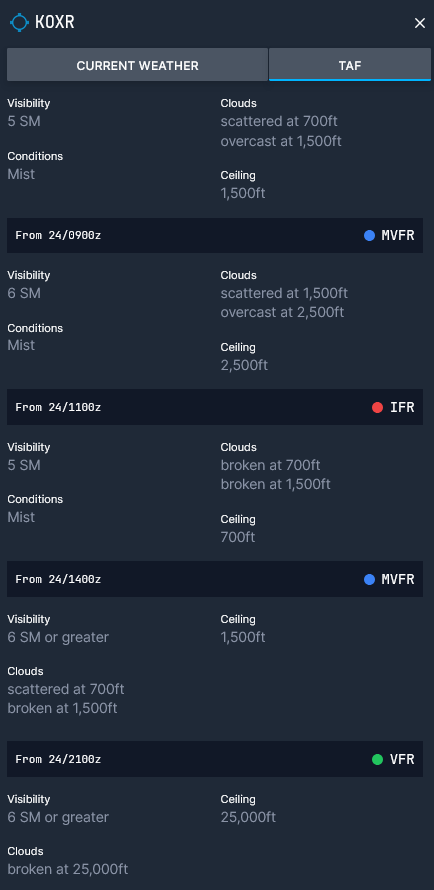
The TAF reveals that, although the weather is expected to be Marginal VFR soon, if we want to be able to fly without running into clouds on climb out, we’ll have to wait until 24/2100z. That means the day 24 of the month (November) at 21:00 UTC time (12:00 pm local in LA).
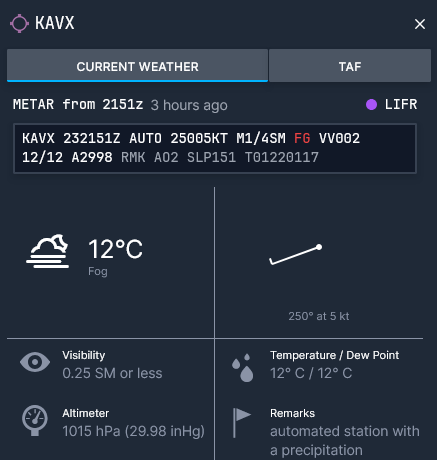
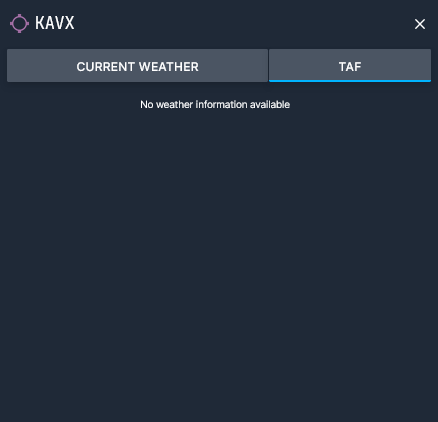
The weather situation at Catalina is even worse, with fog covering the airport to give a less than 1/4 mile visibility. Unfortunately, Catalina doesn’t have a TAF, so we’ll have to check the METAR again close to departure to ensure that it’s safe to go.
Flight Details
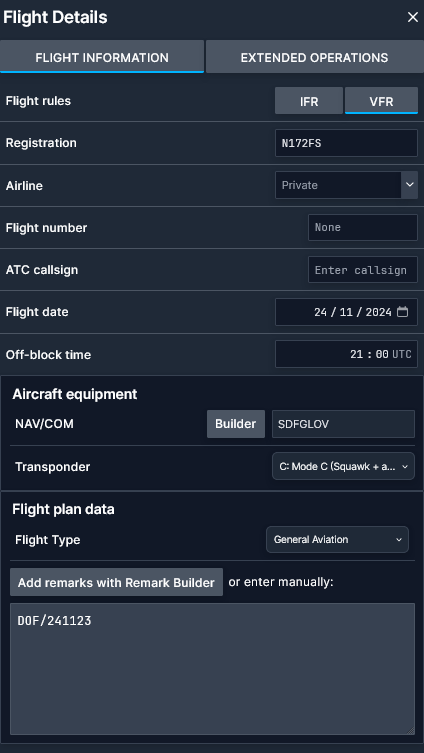
The Flight Details section has some information that’s mostly relevant to ATC. Our flight rules are VFR; the registration is up to you; we’re not flying for an airline so that is left private, and the flight numbers and ATC callsigns are left blank. As we checked in the previous section, we’ll have to depart on the 24th at 2100z, so that’s the flight date and off-block time we’ll assign.
You can use the equipment builder to easily put your equipment codes in. For the Cessna 172, the equipment on board includes standard equipment, DME, ADF, GNSS, ILS, VOR, and VHF RTF. Lastly, the transponder has mode C capabilities and the flight type is General Aviation.
Fuel & Payload
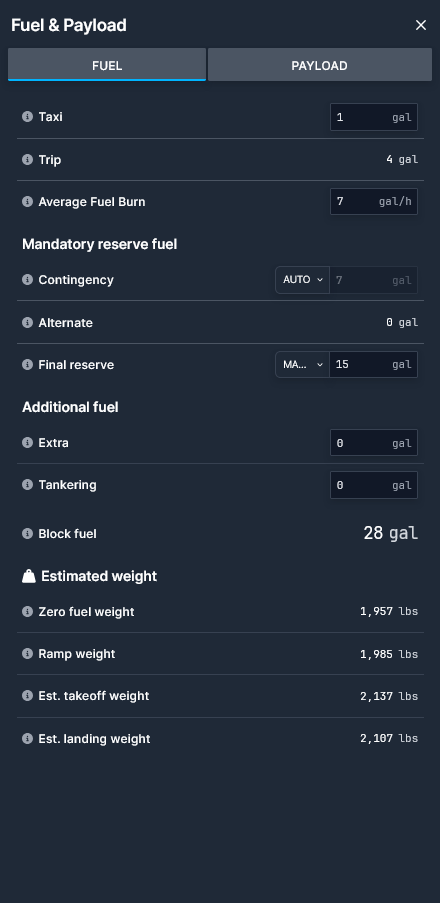
Provided you correctly set up the average fuel burn, the Fuel & Payload page should show you a block fuel value that will be enough to get you to the destination, plus an extra reserve that is automatically calculated. In this case, 19 gallons seems like a reasonable amount for a 39-minute flight such as this, but since Catalina doesn’t have fuel, I’ll change the final reserve to 15 gallons. This can be done by changing the ‘Final reserve’ mode from auto to manual and setting it to 15.
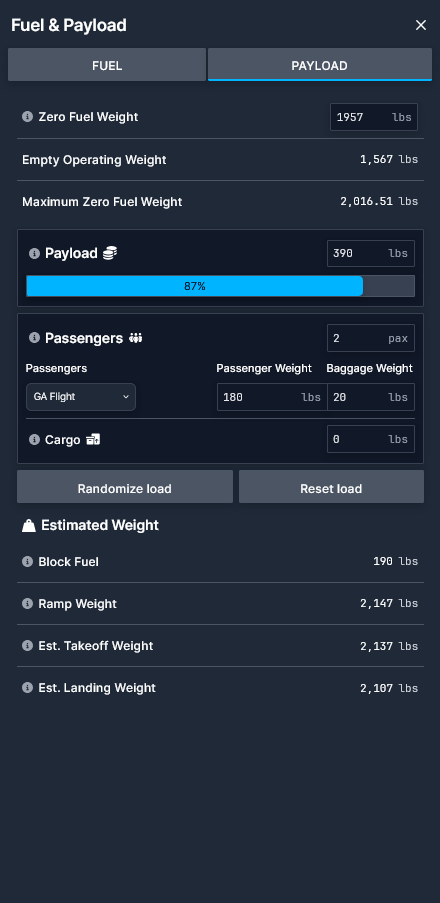
The payload page allows you to set a load percentage or a random load and gives you the weight of each passenger and cargo so you can set the weights using the EFB in the sim. Apart from setting a percentage, you can also manually set the passenger and cargo quantities and weights. I set two 180 lb passengers and no cargo for this flight.
Briefing
The briefing section contains both the OFP (Operational Flight Plan) and a nav log with all your waypoints. OFPs are flight plans that contain every detail of the flight, including the payload and fuel weights, departure and arrival times, the flight plan’s waypoints, and more. These generally aren’t used for general aviation flights such as this, so we’ll only use the nav log in this section.
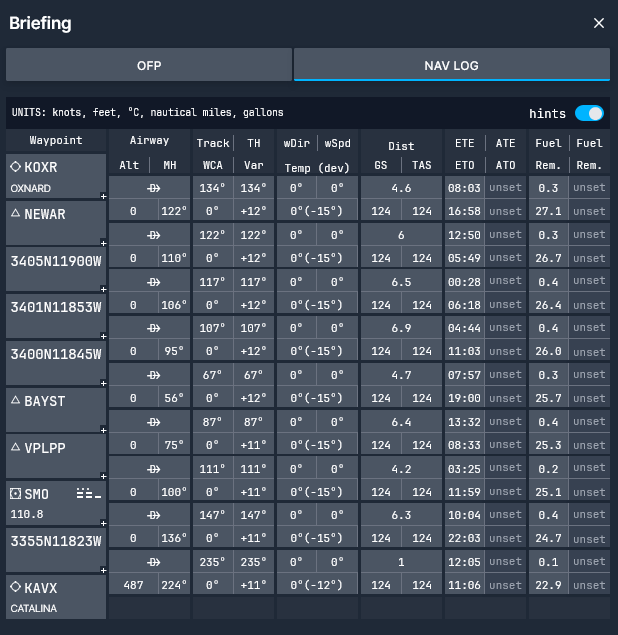
The VFR nav log contains a lot of useful information such as the altitude, magnetic heading, distance, estimated time enroute, and wind speed expected at every waypoint. As you can see, some of these appear to be a bit broken at the moment, as the altitude and winds are showing zero. As you fly along, you can set the ATE (Actual Time Enroute) and fuel remaining to keep track of your progress through the flight.
In The Sim
Now that we’re done with the flight plan, we need to save it so that it can be loaded up in MSFS. This is done by clicking the save icon on the bottom left of the screen, giving it a name, and then clicking on ‘Save new plan’. In this same screen, you can also share the flight plan with a link, so if you’d like to view the flight plan used in this guide, you can do so here.
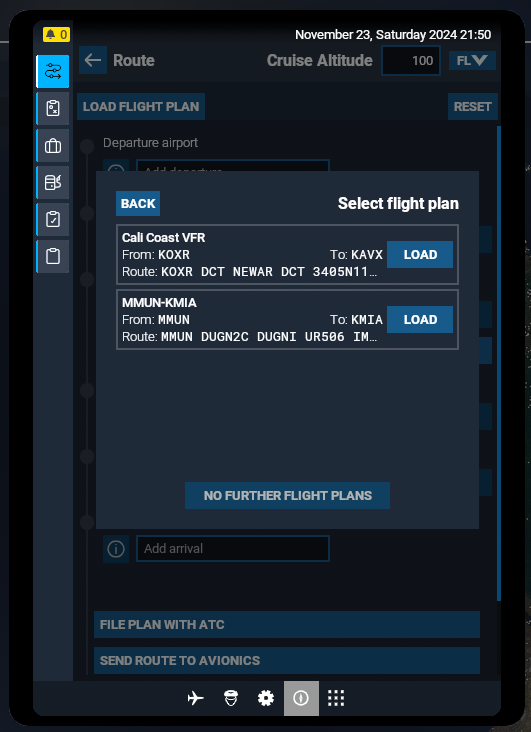
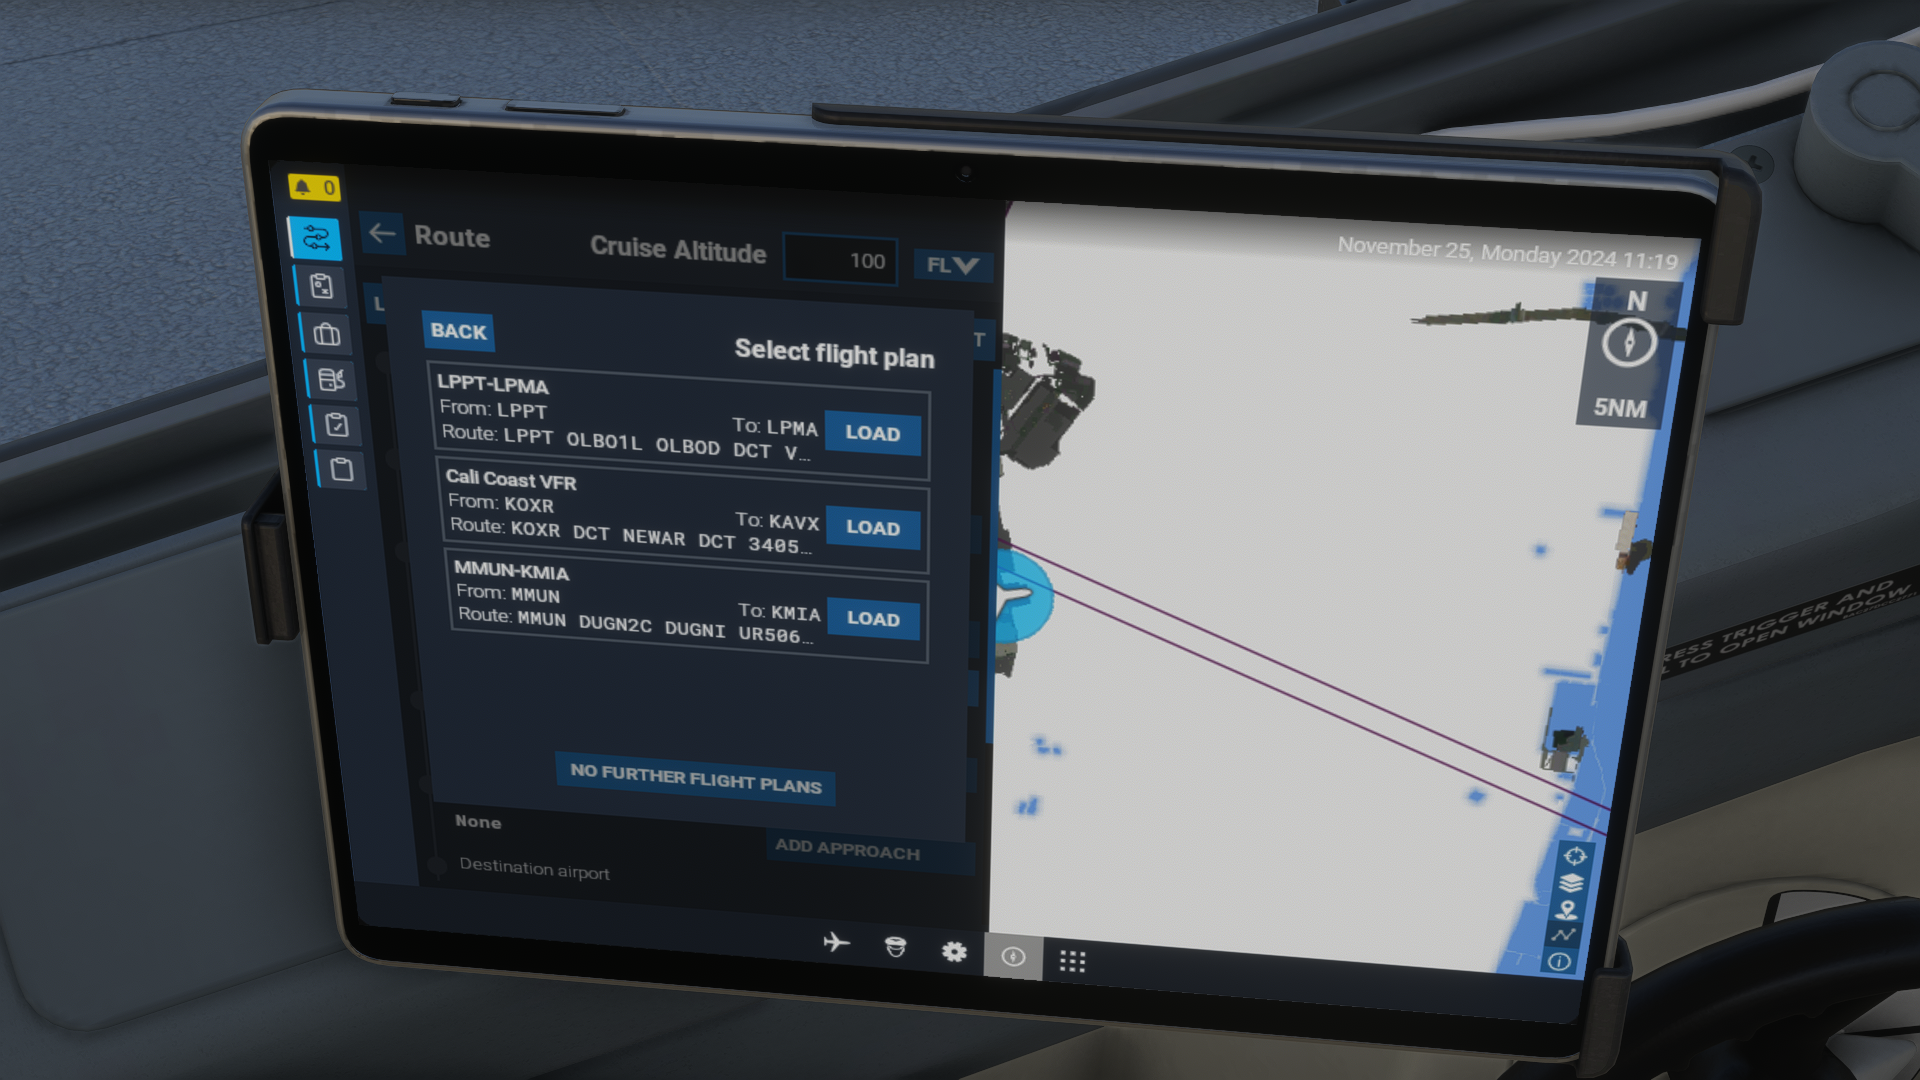
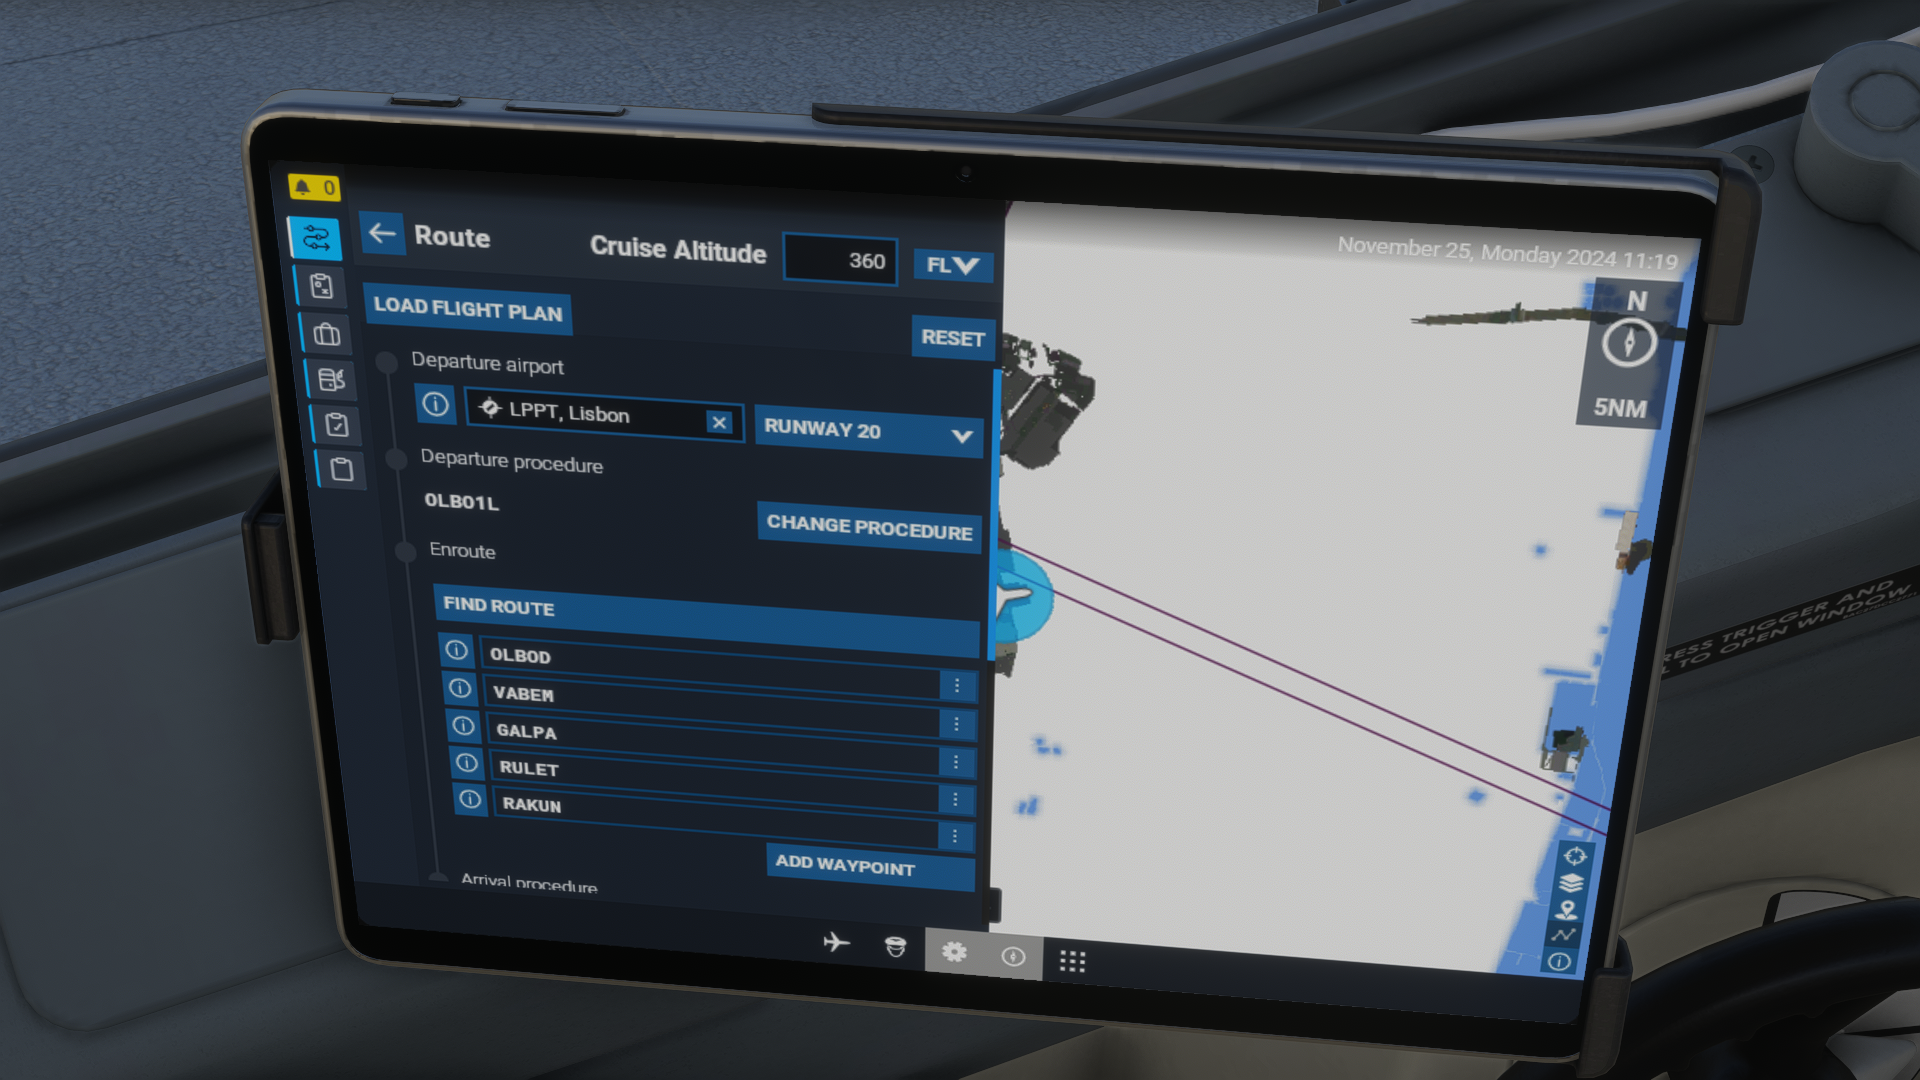
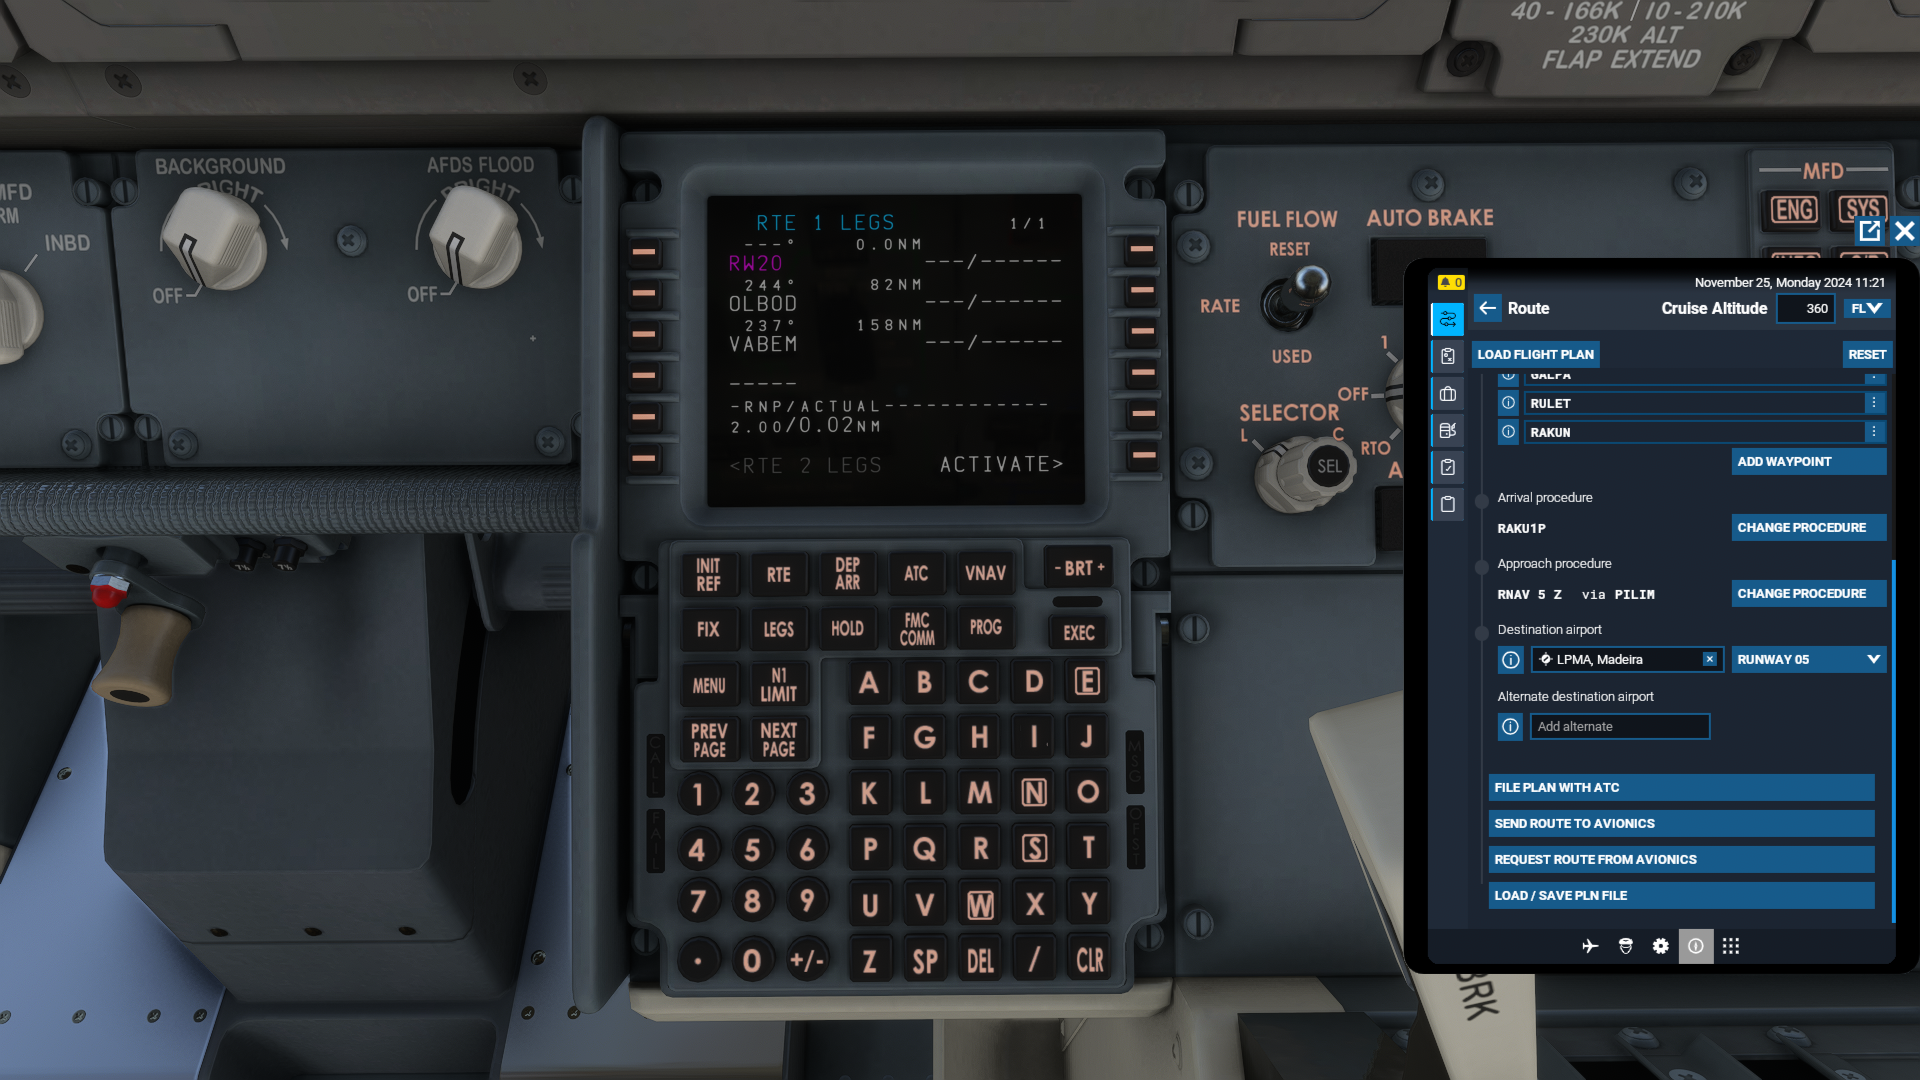
Once the flight plan is saved, it can be loaded up in the sim by using the EFB. Click on the EFB tool at the top of the screen, open the flight plan app, go to the route page, and then click on ‘Load Flight Plan’. Once it’s done loading, your flight plan should pop up on the EFB. Scrolling down to the bottom of the route page, you’ll see buttons to load the flight plan into your avionics and to file the flight plan with the default MSFS ATC.

IFR Planning
IFR stands for “Instrument Flight Rules.” These types of flight plans are most often used with airliners or by general aviation pilots wanting to fly through bad weather and/or avoid dealing with airspace. They require you to follow a specific, filed route and maintain constant ATC communication throughout the entire flight. Despite being a bit more complicated to fly, they tend to be more straightforward than VFR flights to plan, as much of the route-choosing is made automatically and you don’t have to consider airspace avoidance.
Setup
To begin planning an IFR flight, we first need to set one of the IFR map presets. If the flight will be done below 18000 feet, the IFR low preset should be selected. If the flight is above 18000, then choose IFR high. I plan on recreating this flight from Lisbon to Madeira, so in the options settings I need to set the altimeter to hPa, weights to kg, fuel to kg, and navlog to IFR or modern to ensure the weights and altimeter settings are in the correct units for a flight in Europe.
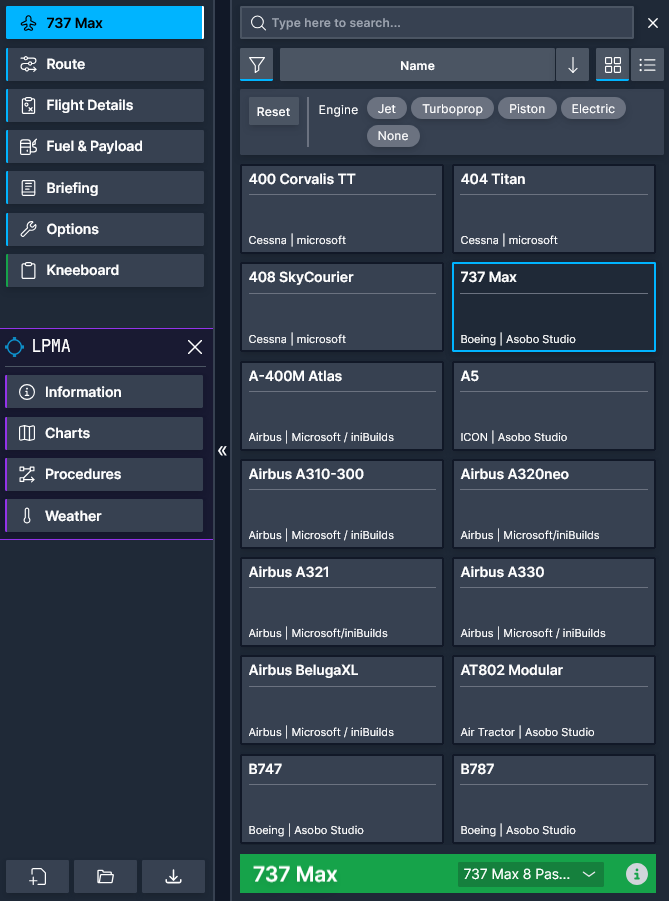
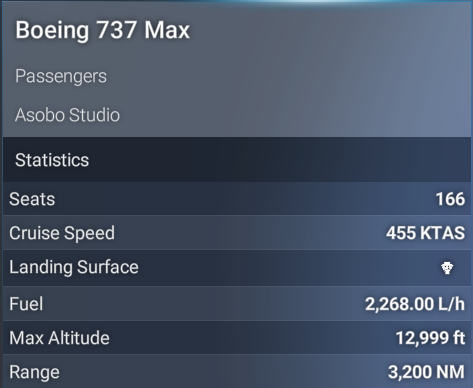
Next, since the flight is done with a 737 MAX 8, I’ll choose that in the aircraft selection menu. Make sure that when you select an aircraft, you also select the correct variant. At the bottom of the aircraft selection menu, you’ll see that the default variant for the 737 MAX in the flight planner is the BBJ, but this is a passenger flight, so it must be changed to “737 Max 8 Passenger” to get the correct fuel and payload numbers.
Route
Getting an IFR route with the flight planner is fairly simple. First, once we are on the route page, we click the ‘Add’ button below ‘Origin’ and look for the departure airport of Lisbon. This can be done by searching for either the airport name or the ICAO code, LPPT in this case. Do the same for our destination of Maderia (LPMA), and then click on the ‘Auto-Route’ button to let the planner handle getting an appropriate IFR route. This will also automatically choose a departure and arrival procedure based on the runway in use and weather conditions at both airports.

Next, we must inspect the route, particularly at the departure and arrival ends to make sure there are no issues. The departure from Lisbon looks correct, but the arrival at Madeira has some issues. First, the planner has selected an arrival procedure that conflicts with the approach, as it wants us to get to PILIM, and then turn around to reach FUN12. Next, the selected approach is the VOR DME for runway 05; there’s nothing really wrong with this approach, but RNAV approaches tend to be easier to fly, and runway 05 has an RNAV approach available, so let’s change it.
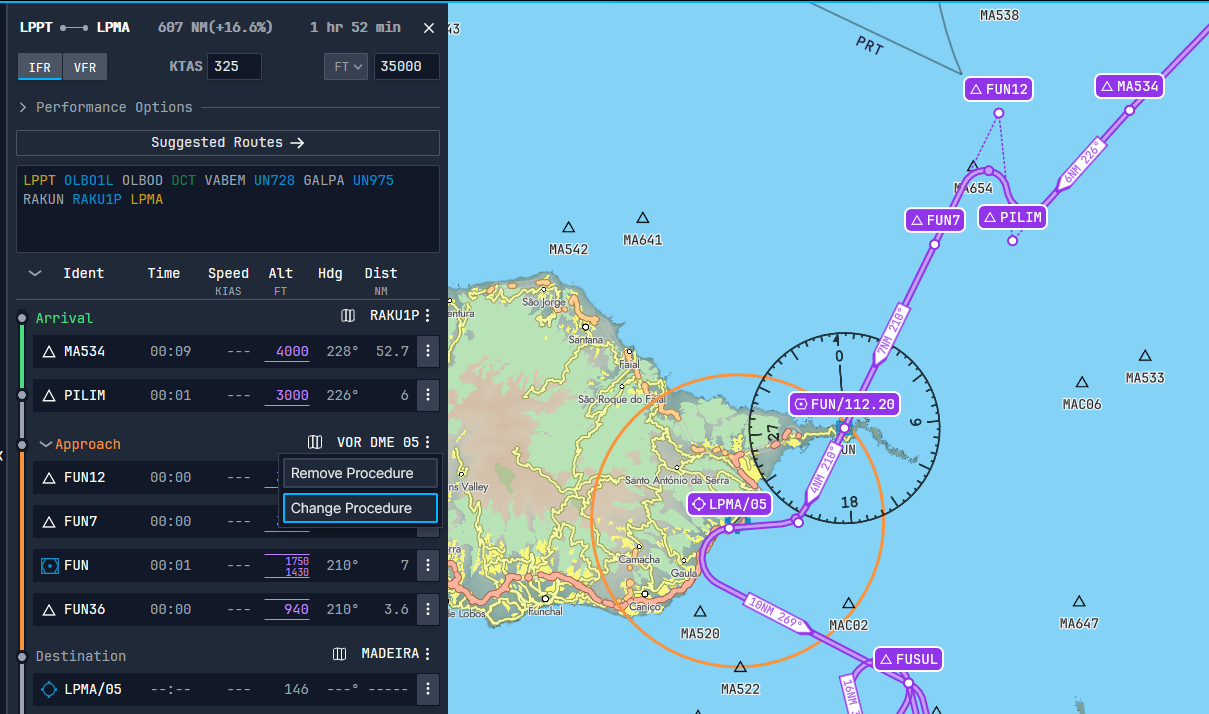
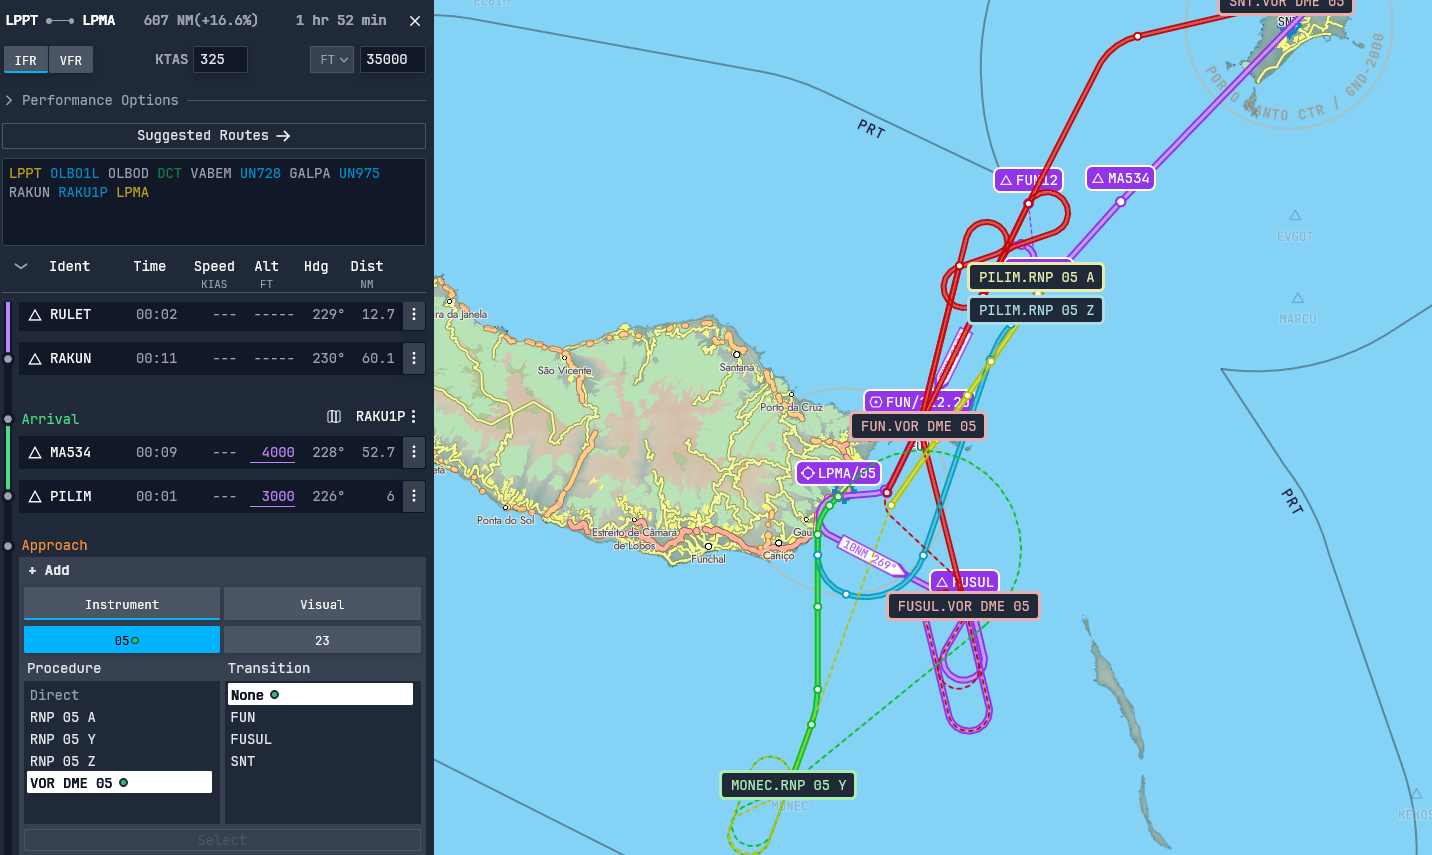
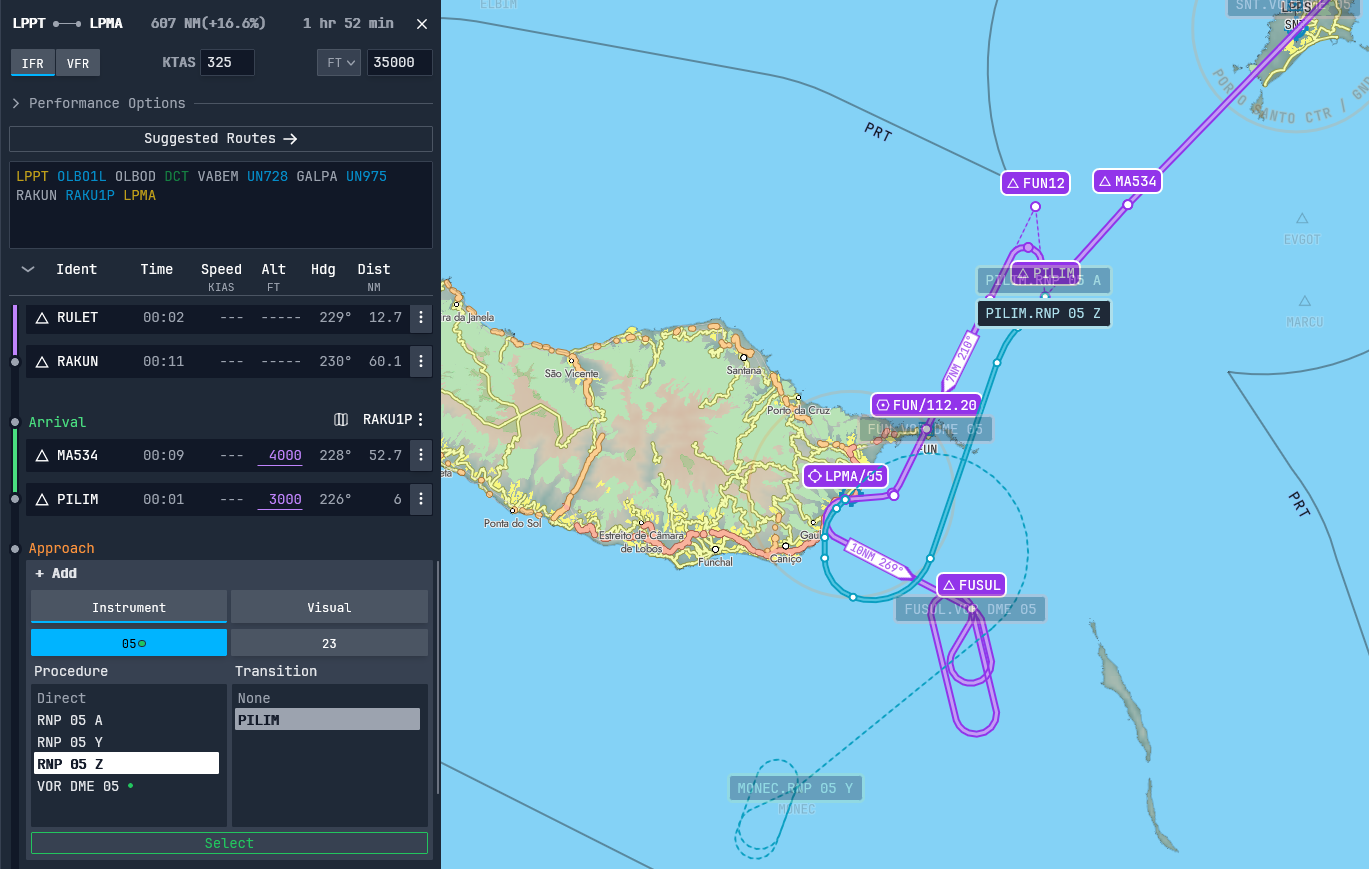
Clicking on the “Change Procedure” button reveals all the available approaches for the airport. Inspecting each one, you can see that the RNP 05 Z connects with the PILIM waypoint in our arrival and guides us right to the runway, so let’s select that one.
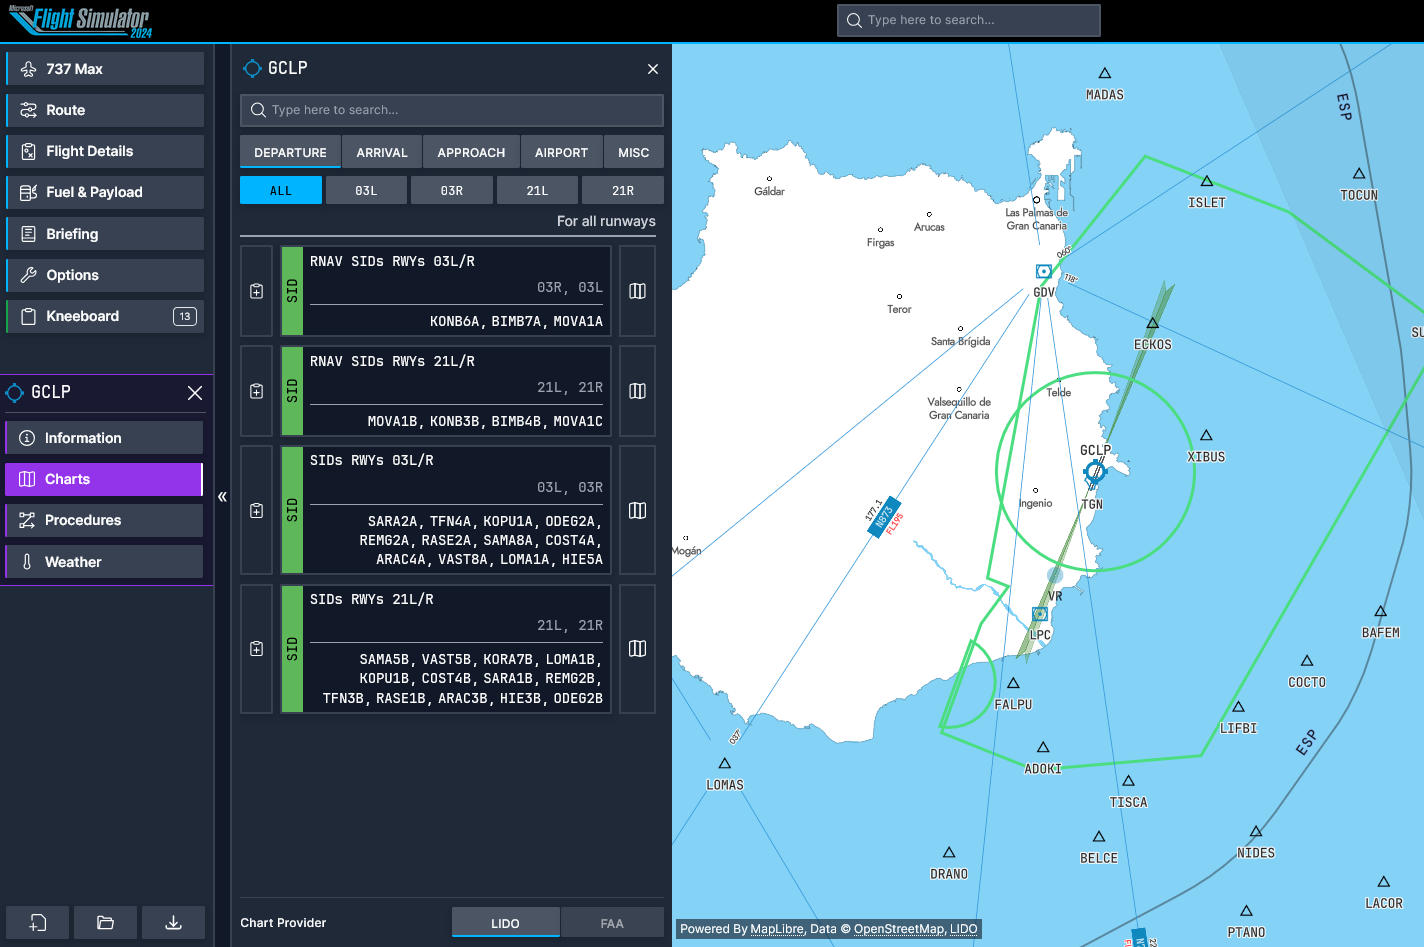
Lastly, we must add an alternate airport to fly to in case we can’t land at Madeira. Gran Canaria Airport (GCLP) is far enough away that it won’t be impacted by weather issues at Madeira, but close enough to serve as a suitable alternate. Scrolling down to the bottom of the route page lets us search for the alternate airport, and once it’s added, it gives us a route that we can use should we need to divert.
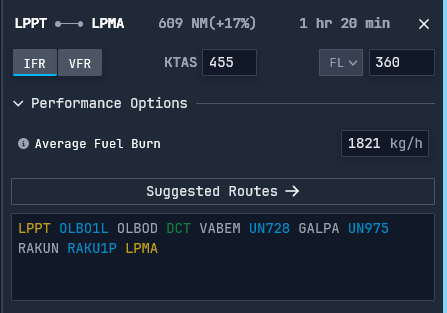
Now that our route is done, we need to select the appropriate speed, altitude, and fuel burn. As with the VFR flight, a rough estimate of the speed and fuel burn can be found in the aircraft selection menu in MSFS. For the 737 MAX, the speed is 455 KTAS and the fuel burn is 2268 L/h, or about 1821 kg/h.
Choosing an appropriate cruising altitude for a jet flight can be a bit tricky. Generally, you want to fly as high as you can depending on several performance factors, such as weight, wind, temperature, and more. Additionally, when doing a flight to the West (bearing 180-359), the thousands of the altitude you’re flying at should be even (e.g. 34000/FL340) and when doing a flight to the East (bearing 0-179), the thousands should be odd (e.g. 35000/FL350). To keep things simple, I’ll choose to fly at FL360, which is appropriate for the direction of flight and should be no problem for the plane to get to.
Flight Details
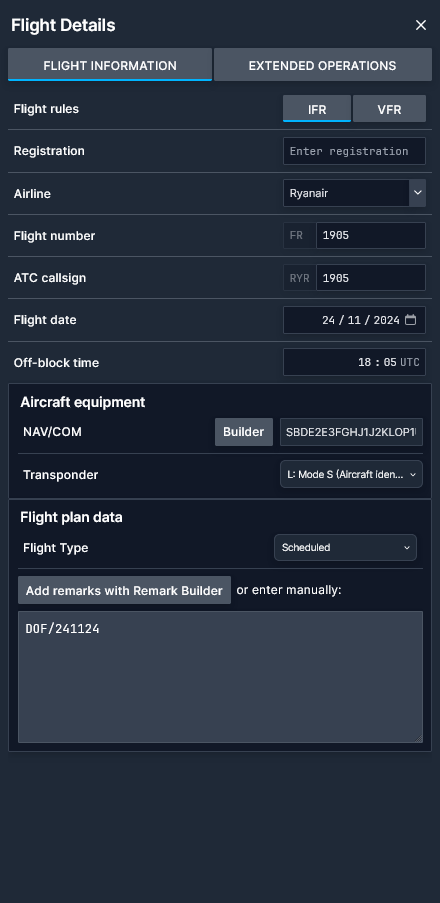
In the flight details page, you’ll put information that’s mostly relevant to ATC. The flight rules for this flight are IFR, the airline is Ryanair, the flight number is FR385, the ATC callsign is RYR385, and the flight date and off-block time are up to you. You can use the builder to set the equipment, and the transponder should be code L (Mode S with aircraft ident, altitude, ADS-B, enhanced surveillance). The flight type is scheduled.
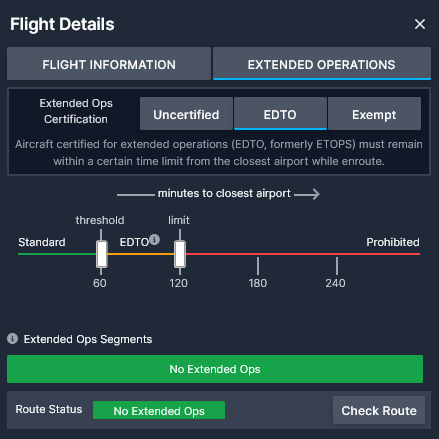
Routes flown with twin-engined aircraft like the 737 MAX must comply with EDTO (Extended Diversion Time Operations). These safety standards require aircraft flying over water for extended periods to fly routes that keep them within a certain range of airports to land at in case of an emergency. Clicking on the “Extended Operations” button opens a menu where we can check if our route complies with EDTO. Clicking on the ‘EDTO’ button and then clicking on the “Check Route” button below tells us that there’s no need to comply with EDTO for this route, so it’s okay.
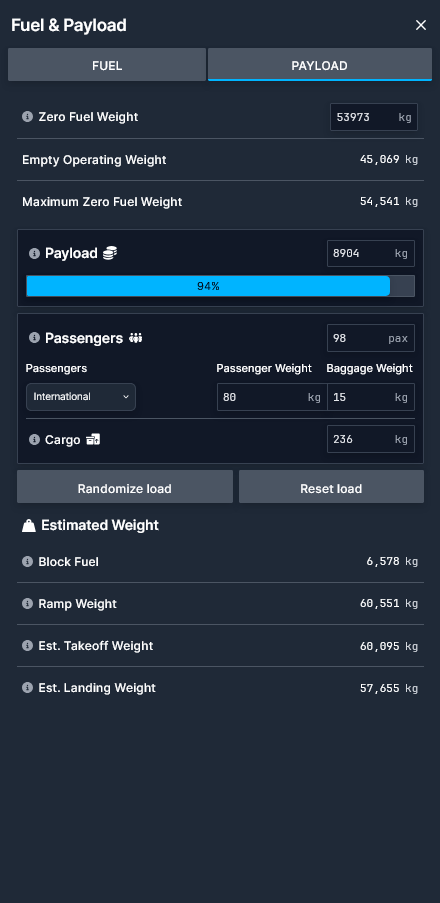
Fuel & Payload
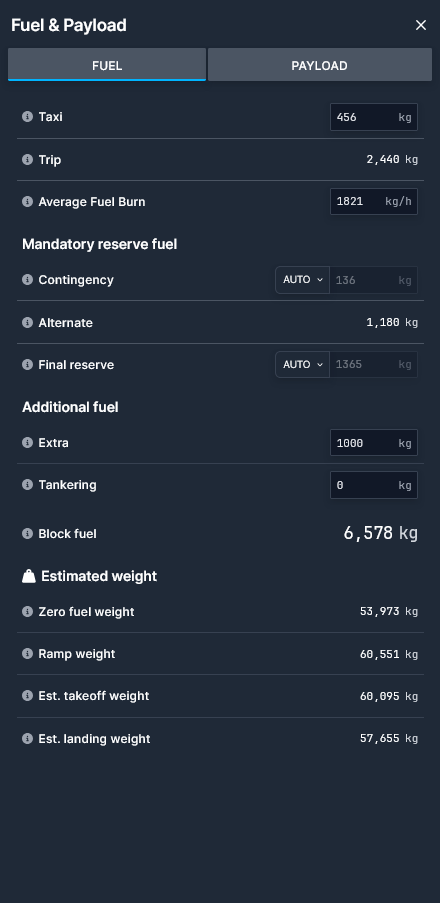
Once you enter the correct fuel burn, the planner will automatically calculate the block fuel you’ll need for the flight, plus a reserve and some extra to get to an alternate airport. This gives us a block fuel of 5578 kg, which seems reasonable for a 1 hour, 20 minute flight in a 737 MAX.
On the payload page, clicking on the bar that says “Click to set payload” lets us set a payload percentage and automatically calculates the passengers and cargo weights. Ensure that the passenger weight is accurate, as mine was set to a rather heavy 165 kg. Once you’re done setting the payload, take note of the Zero Fuel Weight at the top, as you’ll need it when setting up the aircraft’s FMC.
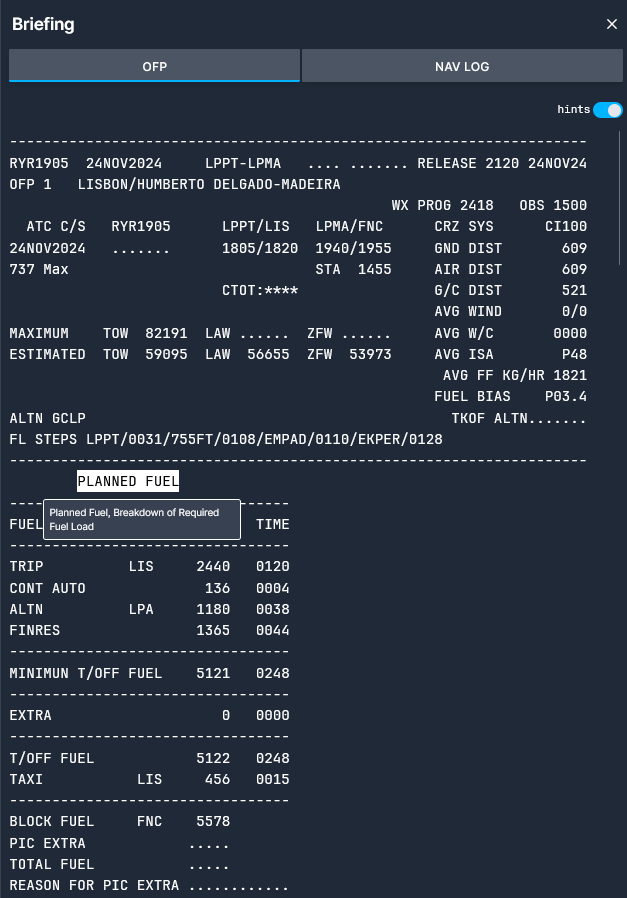
Briefing
The briefing page gives you access to the OFP (Operational Flight Plane) and the Nav Log. An OFP contains every detail of your entire flight plan condensed into a single document, including departure and arrival times, fuel, weights, waypoints, speeds, altitudes, and more. It can be a bit confusing to read, but thankfully the planner comes with a ‘hints’ tool that explains what everything in the OFP is.
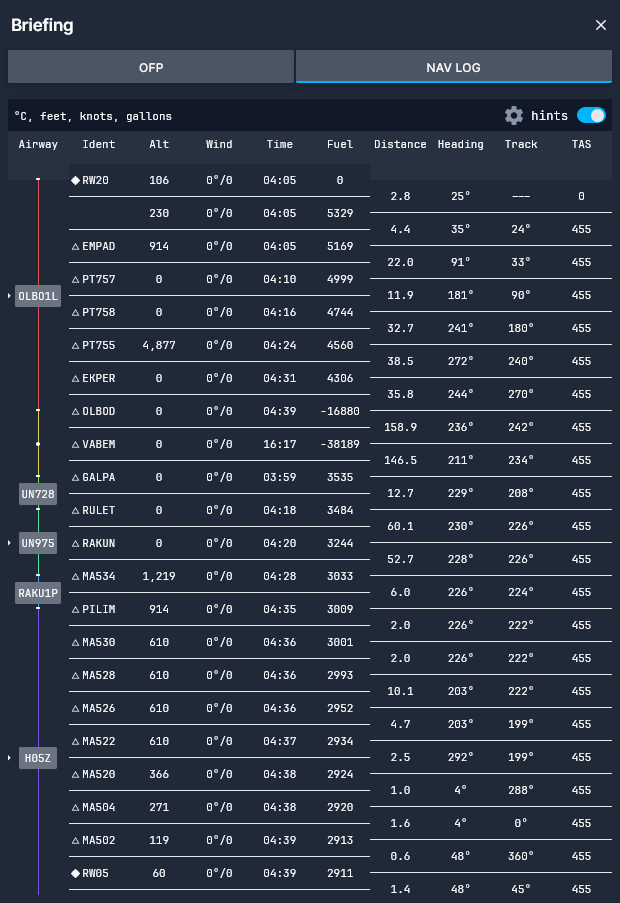
The Nav Log shows you all the waypoints in the flight plan and the speeds, altitudes, wind, and distance to each. The standard IFR nav log is essentially the same as the one in the OFP, but you can also choose to use the more customizable and better-looking “Modern” nav log in the settings.
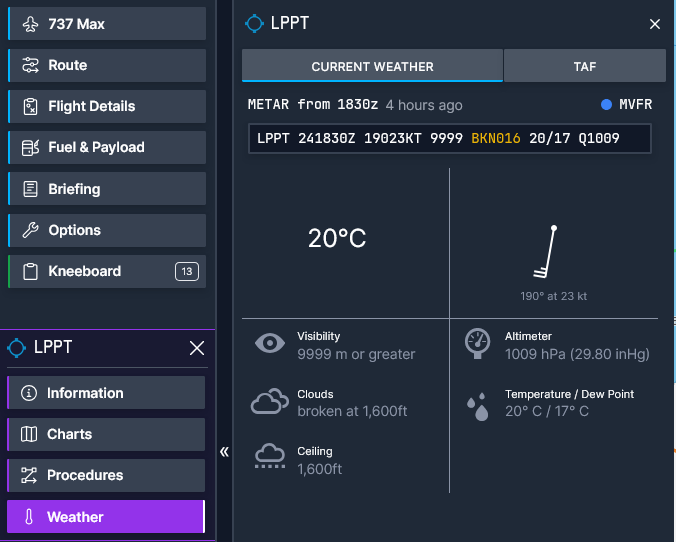
Before departing, you should check the weather at your departure and arrival airports. This can be done by clicking on either airport in the map, which will bring up general information about that airport. Clicking on the ‘Weather’ section will give you a breakdown of the airport’s METAR (METeorologicAl Report) in an easy-to-understand way. The TAF (Terminal Aerodrome Forecast) tab will show you a forecast of the expected weather at that airport for the next 24 hours.
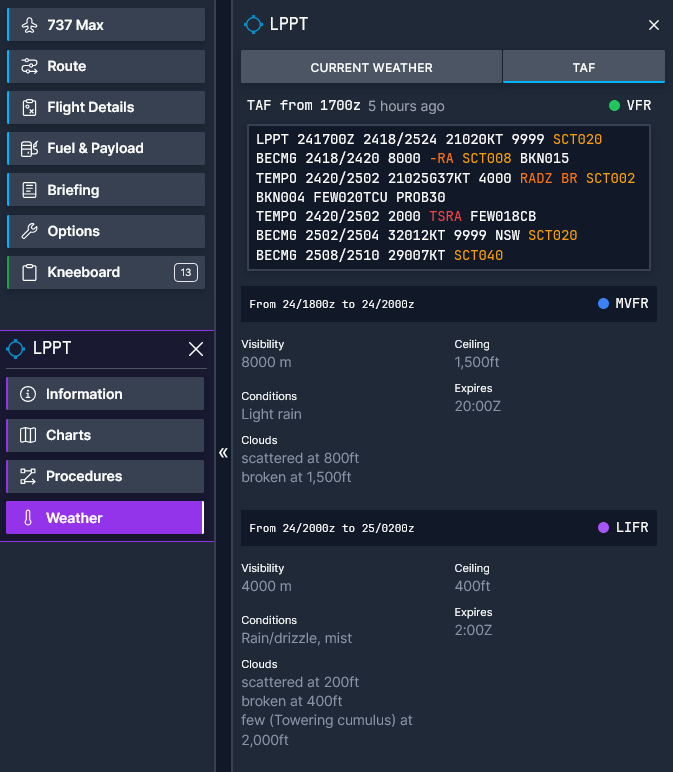
Kneeboard/Charts
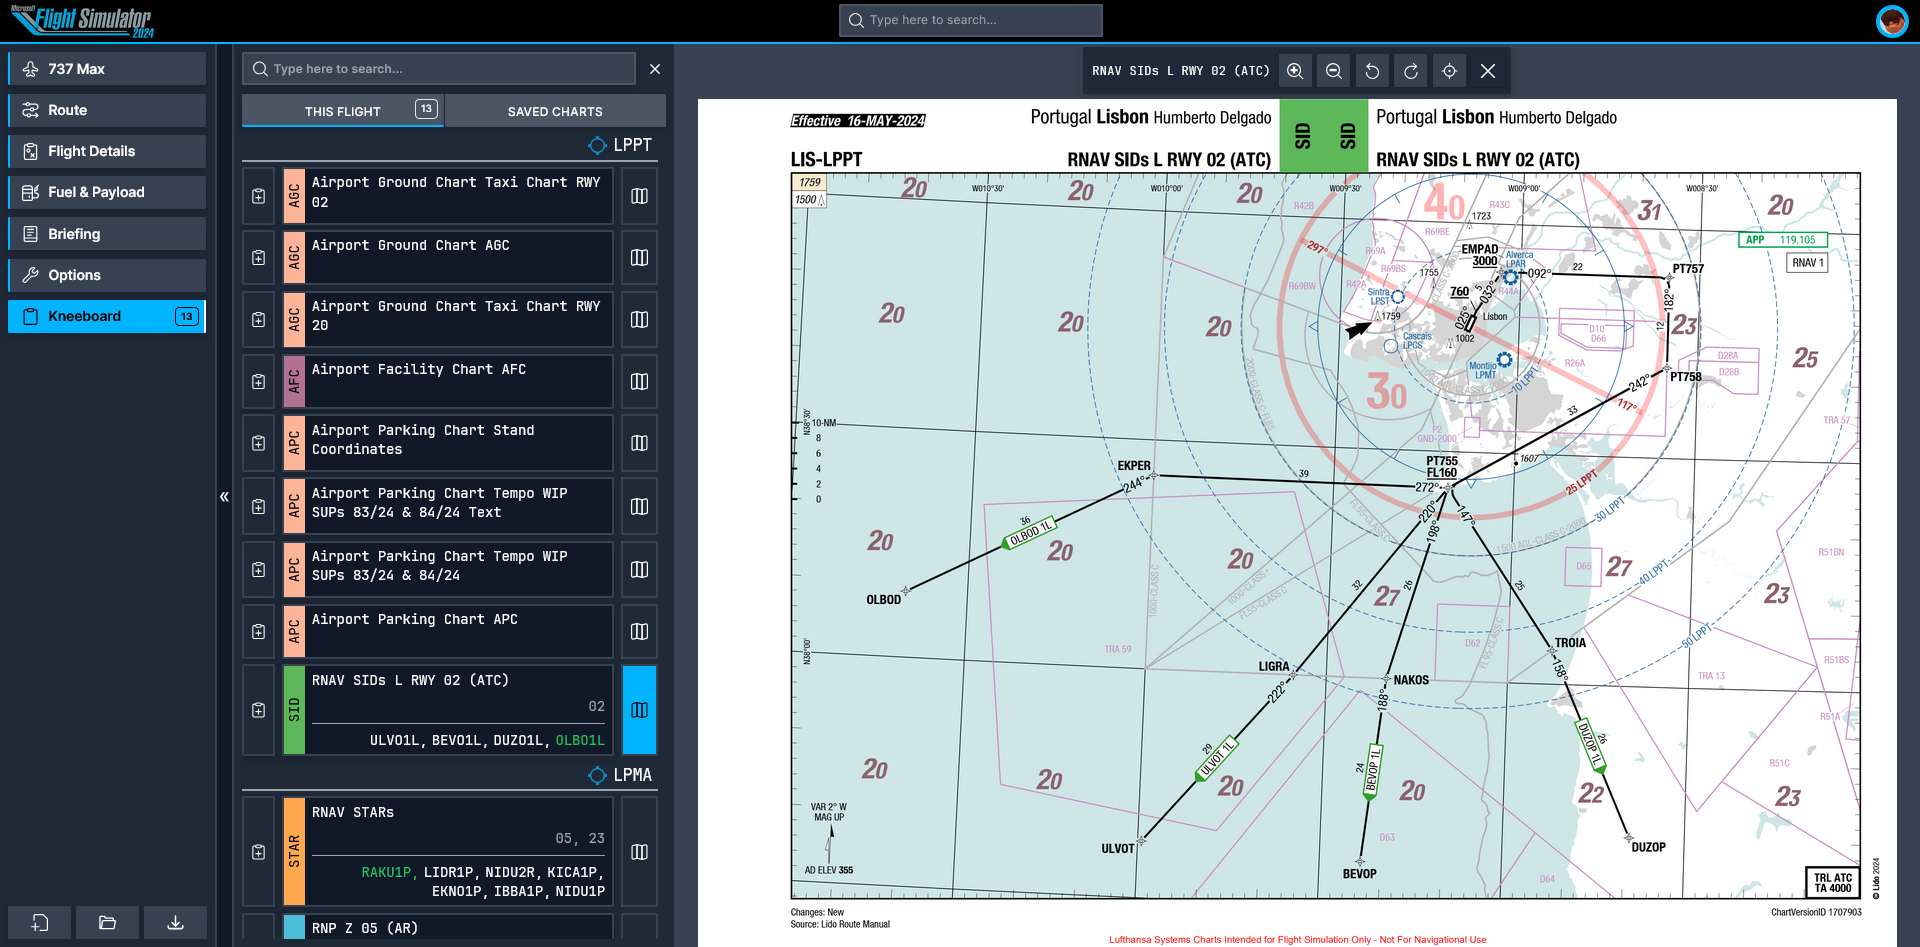
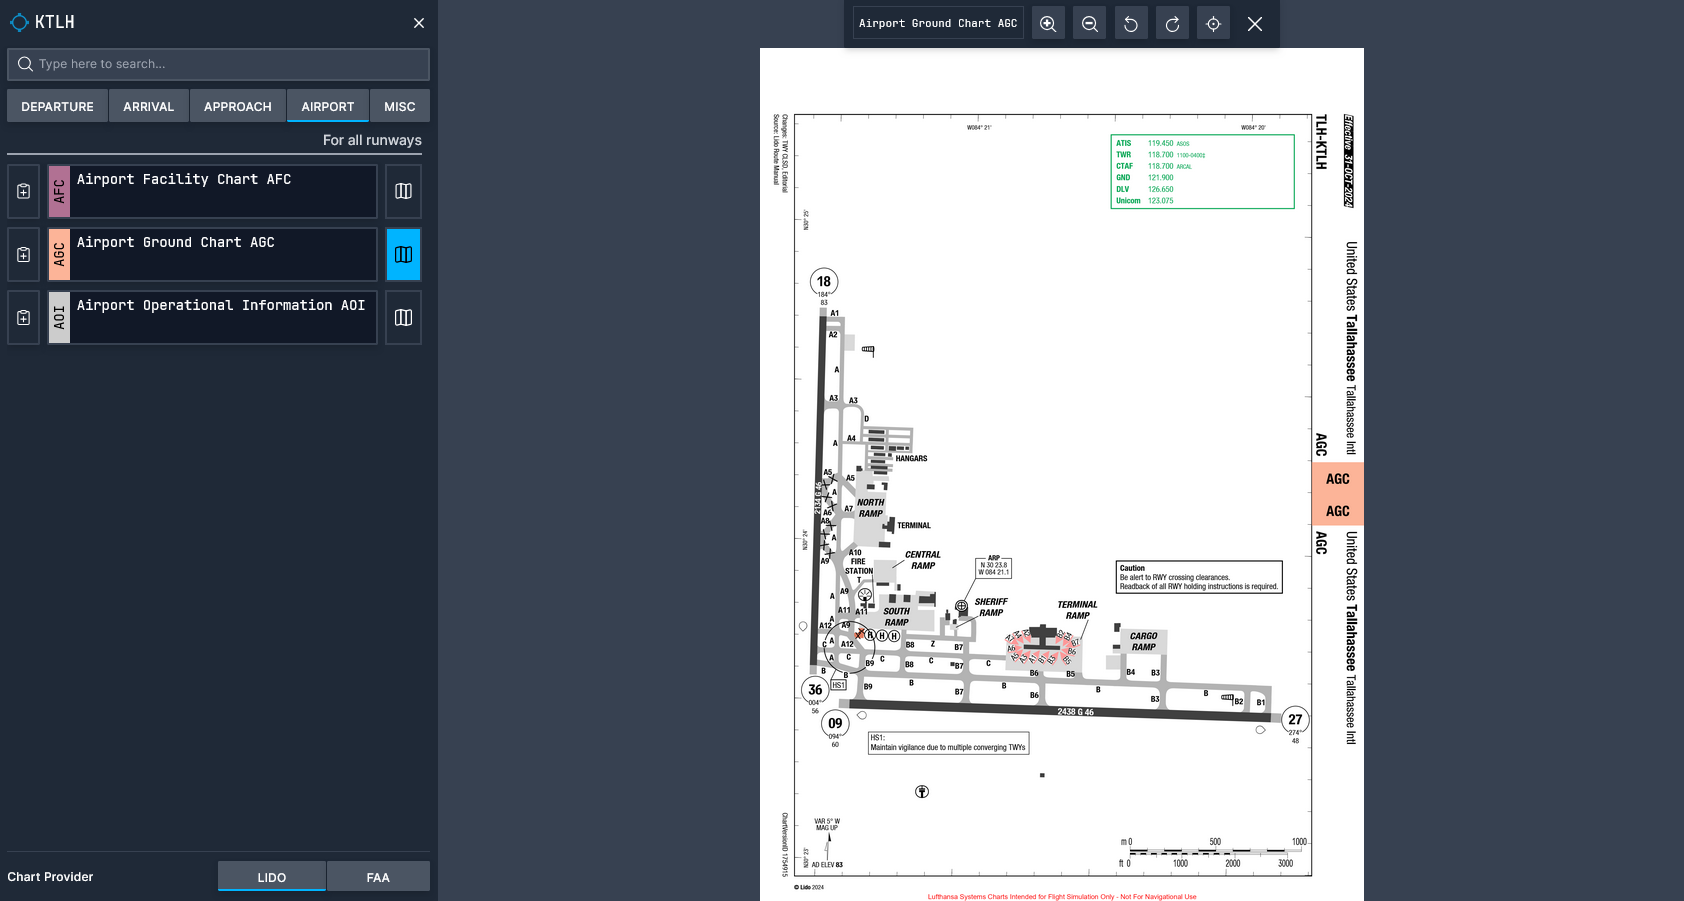
Charts are very important, especially when flying IFR, as they describe the procedures that you must follow when you are doing a departure, arrival, approach, or just taxiing around. One of the best features of the MSFS 2024 flight planner is its inclusion of LIDO charts for almost all airports in the world.
Once you create a flight plan, the kneeboard page will automatically display all the charts you’ll need for that plan. Clicking on the “preview chart” button on the right side of the chart will display it, and clicking on the “pin chart” button on the left side of the chart will move it to the “saved charts” page.
If you want to view all of the airport’s charts or if you want to view the charts of an airport outside of your flight plan, you can do so by clicking on the airport in the world map or searching for it with the search bar at the top of the site. An additional menu will come up on the left side where you can view the airport’s information and all of its charts.
In The Sim
Once you’re done with the flight plan, it’s time to load it up in MSFS 2024. Click on the save icon at the bottom left of the flight planner and give your flight a name, something like “LPPT-LPMA” will do. You can also share flight plans with others on this screen, so if you’d like to view the flight plan used in this guide, you can check it out here.
Once the flight plan is saved, it can be loaded up in the sim by using the EFB. Click on the EFB tool at the top of the screen, open the flight plan app, go to the route page, and then click on ‘Load Flight Plan’. Once it’s done loading, your flight plan should pop up on the EFB. Scrolling down to the bottom of the route page, you’ll see buttons to load the flight plan into your avionics and to file the flight plan with the default MSFS ATC.
Extras
This section includes a few cool features of the planner that I didn’t get to show in the previous sections.
Another Way to Add Waypoints
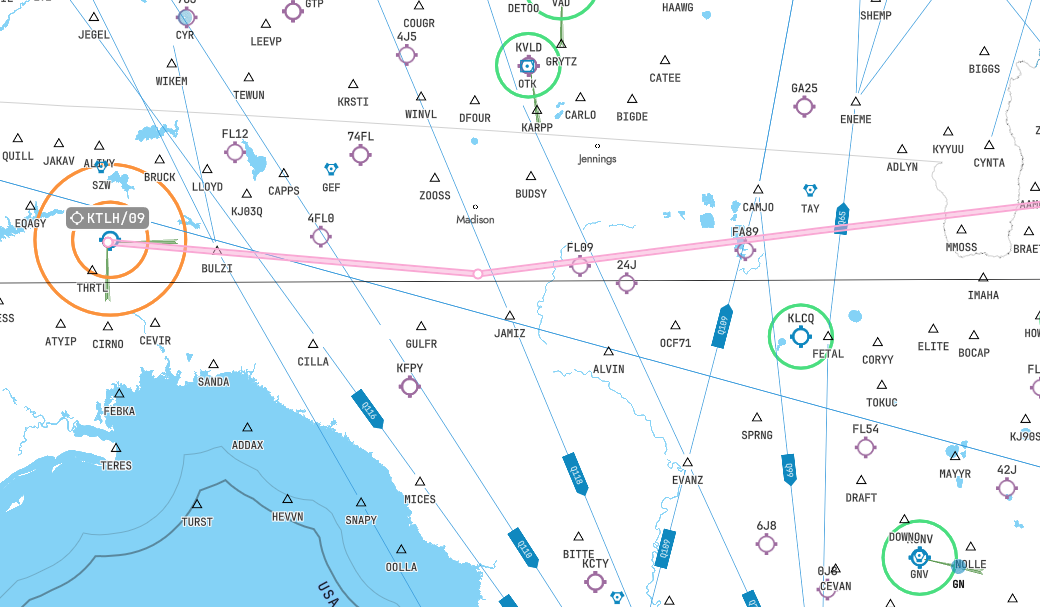
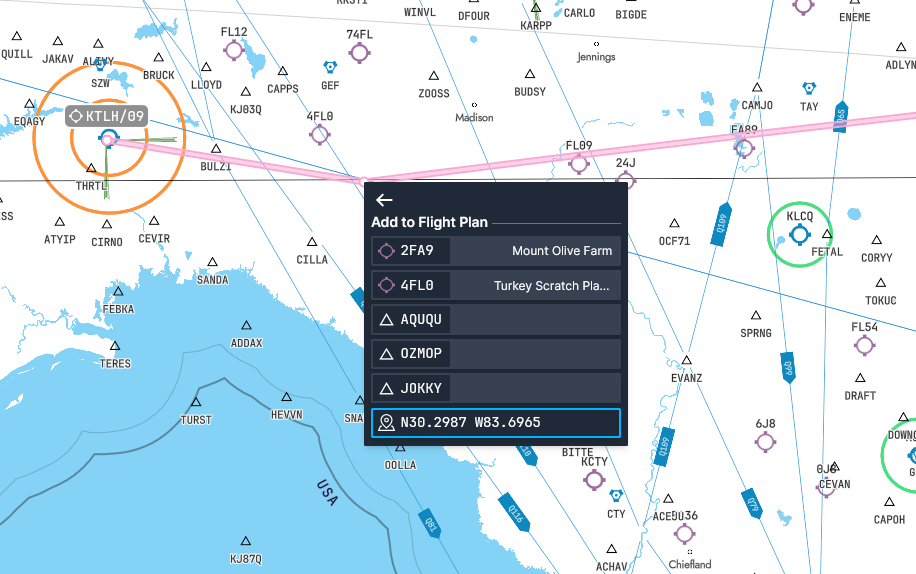
If you’re planning a flight and you want to add a custom waypoint in between two other waypoints, you can click and drag the line between them. Wherever you drop the line, a context menu showing the nearest waypoints will show up for you to add to the plan.
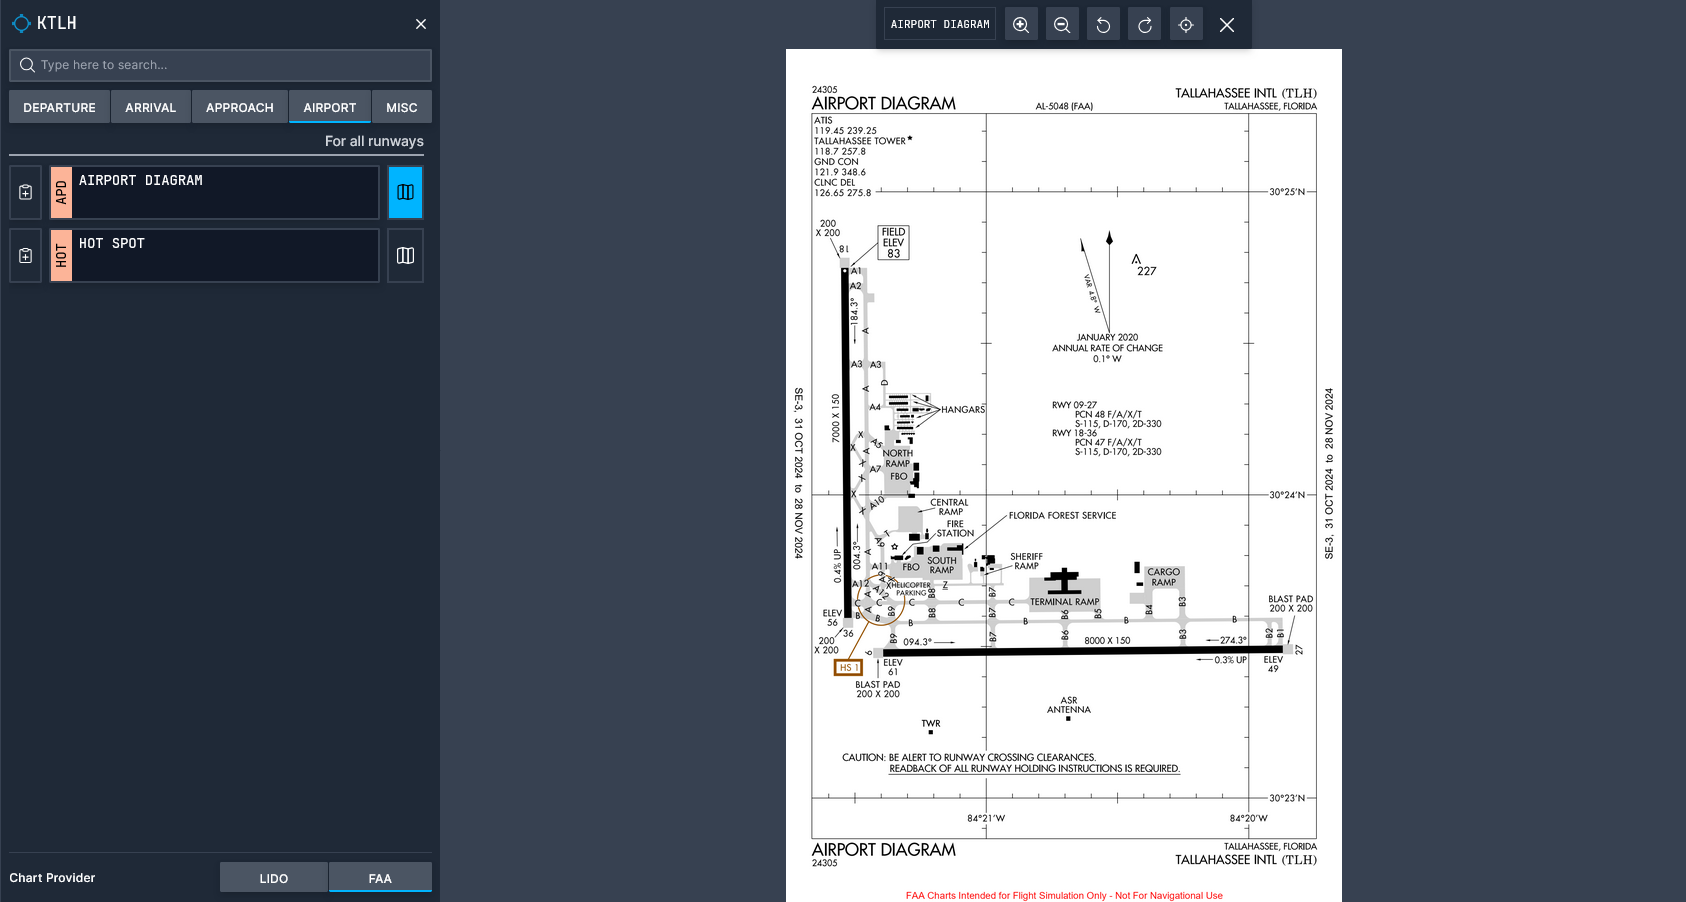
Switching to FAA Charts
If you’re flying in the USA and you prefer the look of FAA charts over LIDO charts, you have the option to switch to them. Search for or simply click on the airport whose charts you want to view, then click on the ‘charts’ button on the left of the screen. At the bottom of the charts menu, you’ll have the option to switch chart providers.
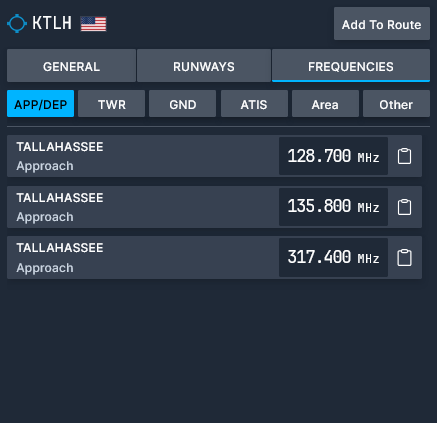
Viewing Airport Frequencies
If you’d like to view all of the frequencies for each controller at an airport, you can do so by searching for or clicking on the airport and then clicking on the ‘frequencies’ tab of the info page. These frequencies are likely pulled directly from the sim, so don’t expect them to be very accurate to real life or for VATSIM flights.
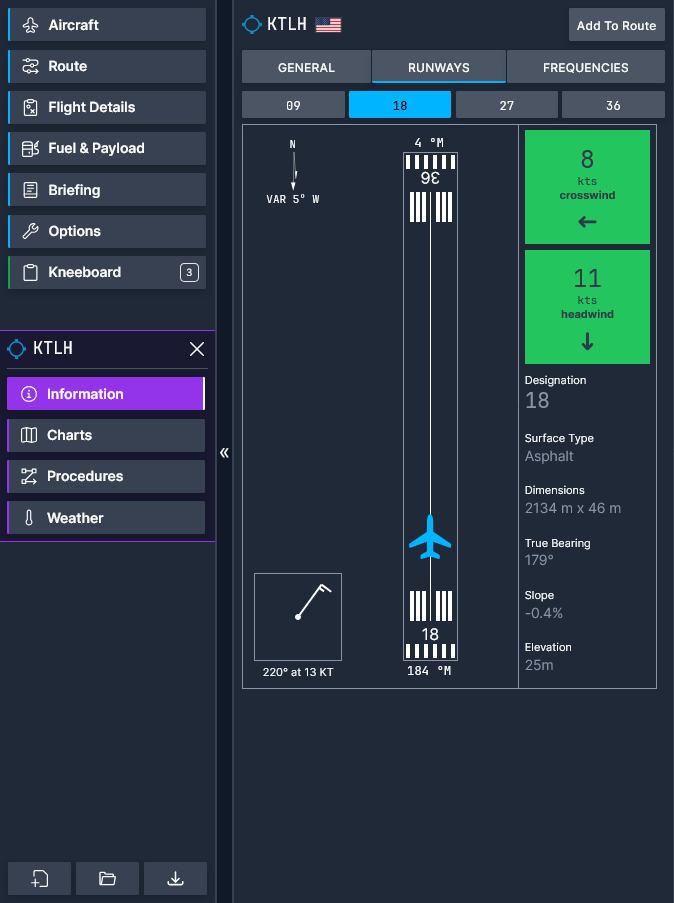
Runway Winds
While the flight planner automatically selects the best runway based on the conditions, if you want to see what sort of wind speed and direction you can expect at the runway, you can check it by searching for or clicking on the airport and then clicking on the ‘runways’ tab of the info page.

Importing From Other Flight Planners
You can create a flight plan in a different flight planner, such as Simbrief, and then import it to the MSFS flight planner by copying the text route from the other planner and then pasting it into the text route box in the ‘route’ page of the MSFS planner. This is especially useful if you prefer to use other planners but still want to upload the route to the avionics of default aircraft or use the MSFS planner’s kneeboard charts.

Closing Notes
The objective of this guide has been to guide you through the process of creating both types of flight plans using the new flight planner available in MSFS 2024. I hope it has helped you gain a better understanding of not just how to use the new flight planner, but also how to plan a flight in general. While using the new flight planner, keep in mind that, as with many things regarding MSFS 2024, it is still early days for the platform and some things may not work as expected.
Stay tuned for even more detailed IFR and VFR procedures and planning guides coming soon. If you have any questions about the MSFS 2024 flight planner or flight sim in general, we’ll be happy to answer them over on our Discord server (link below).
Feel free to join our Discord server to share your feedback on the article, screenshots from your flights or just chat with the rest of the team and the community. Click here to join the server.